
In the modern business landscape, web and data management applications have become increasingly valuable. With FileMaker 20.2+ and Claris Studio, it has become even easier to use both! With FileMaker 20.2+, you can effortlessly incorporate data gathered from Claris Studio web forms into your application. This article provides a practical overview of the capabilities of integrating Claris Studio in FileMaker Pro. Additionally, you'll find a step-by-step guide to implementing this integration to benefit your business. Explore the seamless convergence of web technology and data management for enhanced business efficiency.
What is Claris Studio?
Claris Studio is a web-based platform from Claris that makes it easy to gather, analyze, and manage your data online. It comes with custom forms, dashboards, and many other no-code views. We have an article that gives an in-depth explanation of what Claris Studio is and its capabilities. Check it out if you want to learn more.
Using Claris Studio with FileMaker Pro
One of the most exciting features of Claris Studio and FileMaker Pro 20.2+ is the two-way communication between the platforms. This means you can capture web data by using Claris Studio forms and incorporate that data directly into your FileMaker Pro application. Any Claris Studio data modified in FileMaker Pro will be reflected in Claris Studio, and any data modified in Claris Studio will be reflected in FileMaker Pro.
Before you can start working with Claris Studio Data in FileMaker Pro, you'll need a Claris ID, and you'll need to create a Claris Studio team. Once you have those set up, you're ready to start developing in Claris Studio and FileMaker!
Working with Claris Studio Data in FileMaker Pro
There are many ways you can use Claris Studio and FileMaker Pro together, but for this example, I will be creating a "lead" form on Claris Studio that can be used to gather new business leads on the web. Then I will show you how to connect Claris Studio to FileMaker Pro.
Creating Claris Studio Views
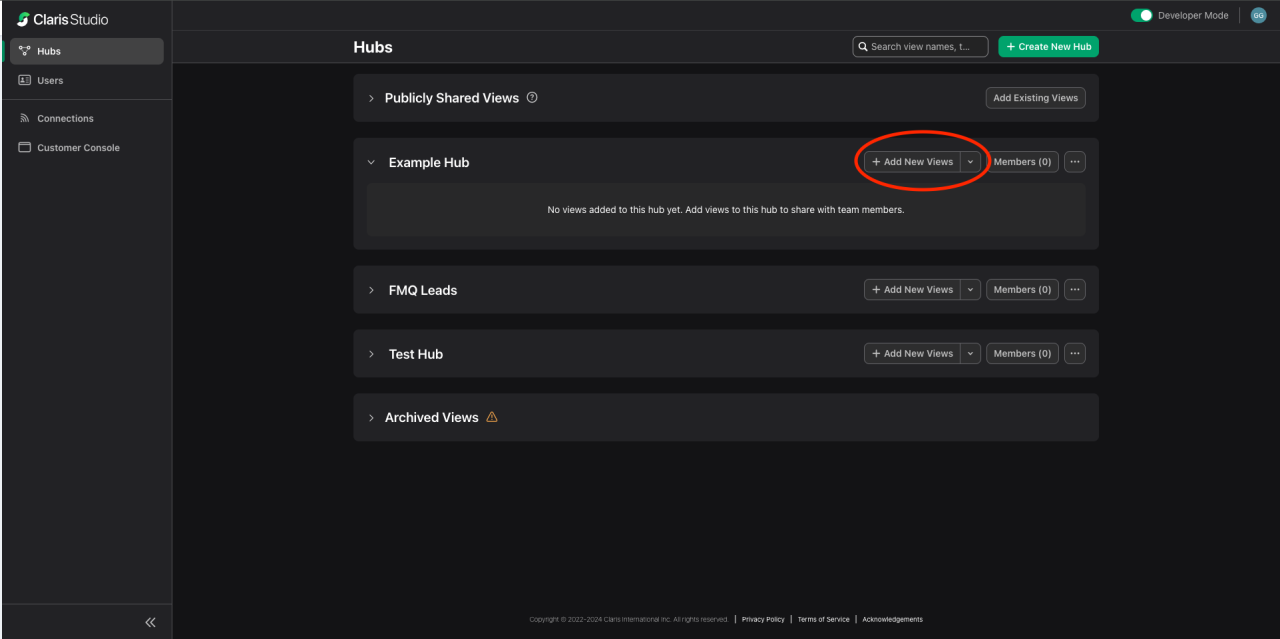
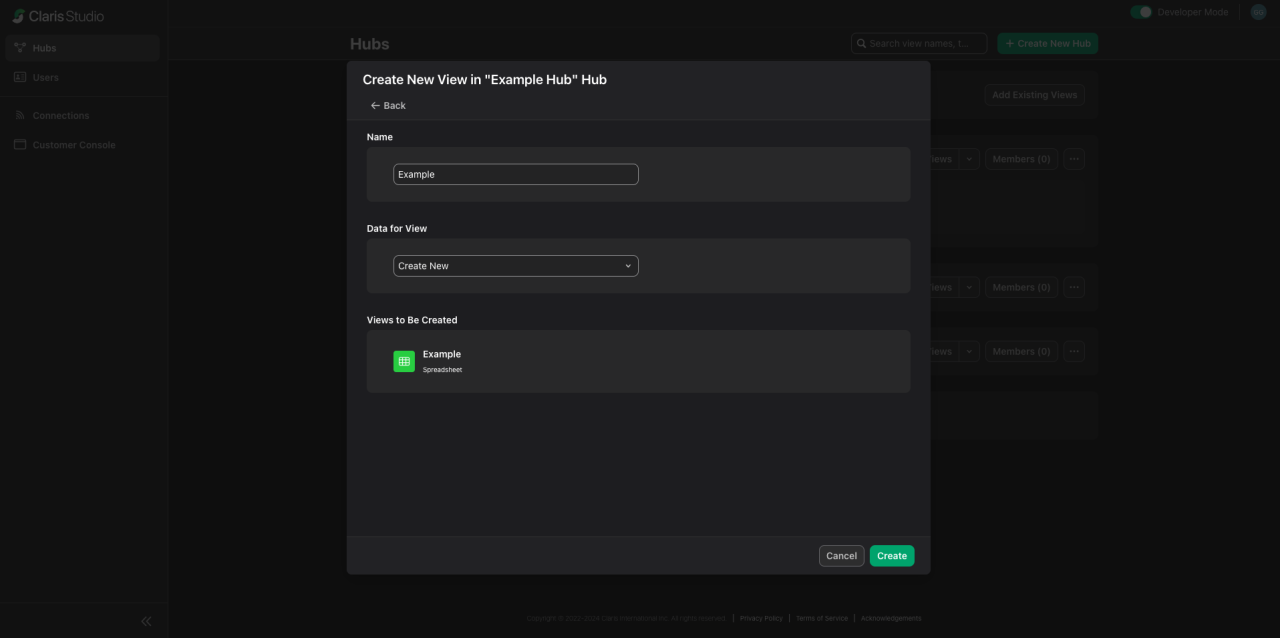
The first step for integrating Claris Studio into FileMaker Pro is to create some views in Claris Studio. You can start by creating a spreadsheet view, which serves as the backbone for other views in Claris Studio and is essentially equivalent to a table in FileMaker Pro. Click on the "Add New Views" button under the hub where you want your data to live.
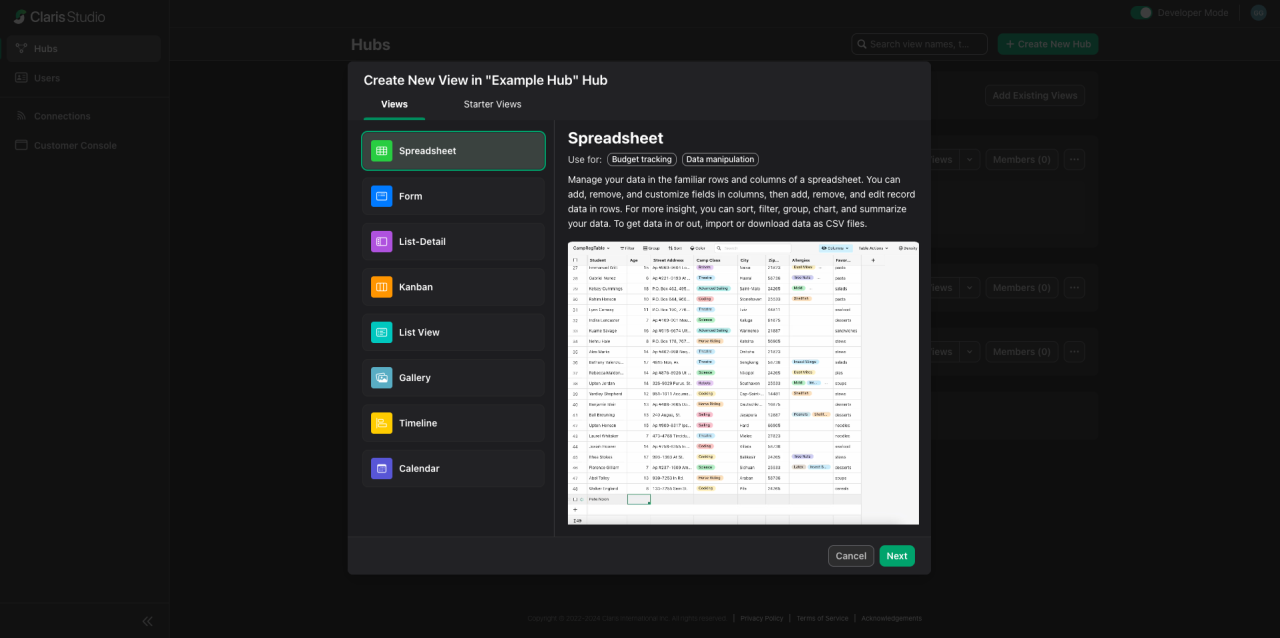
You'll see a new pop-up window that will show you a list of options for which views you can create. We'll be choosing a spreadsheet view.
Next, we need to name our view. There is an option called "Data for View" where you can select another view, and your new view will inherit the data from that view. Since we are creating a new spreadsheet and don't have any data yet, we'll select "Create New," then we'll click "Create" at the bottom.
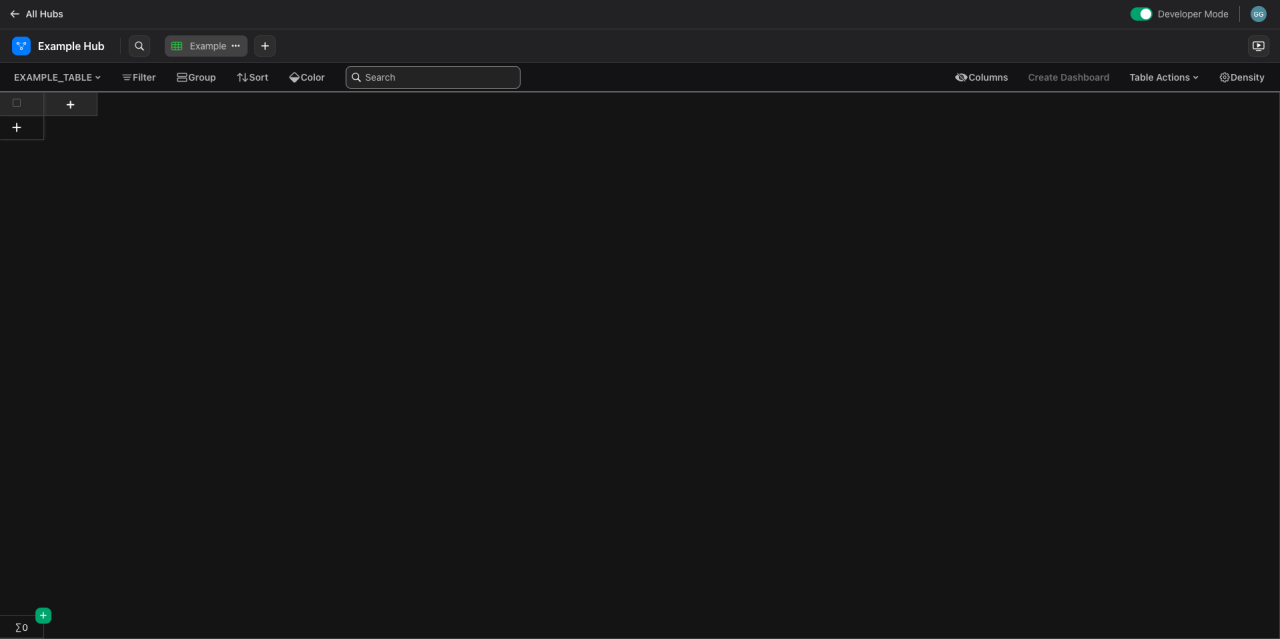
We've got ourselves a new view now, but it doesn't have any data yet. The next step is to add some fields so we can begin gathering our data. You may add whatever fields you see fit, as the fields required are use-case specific.
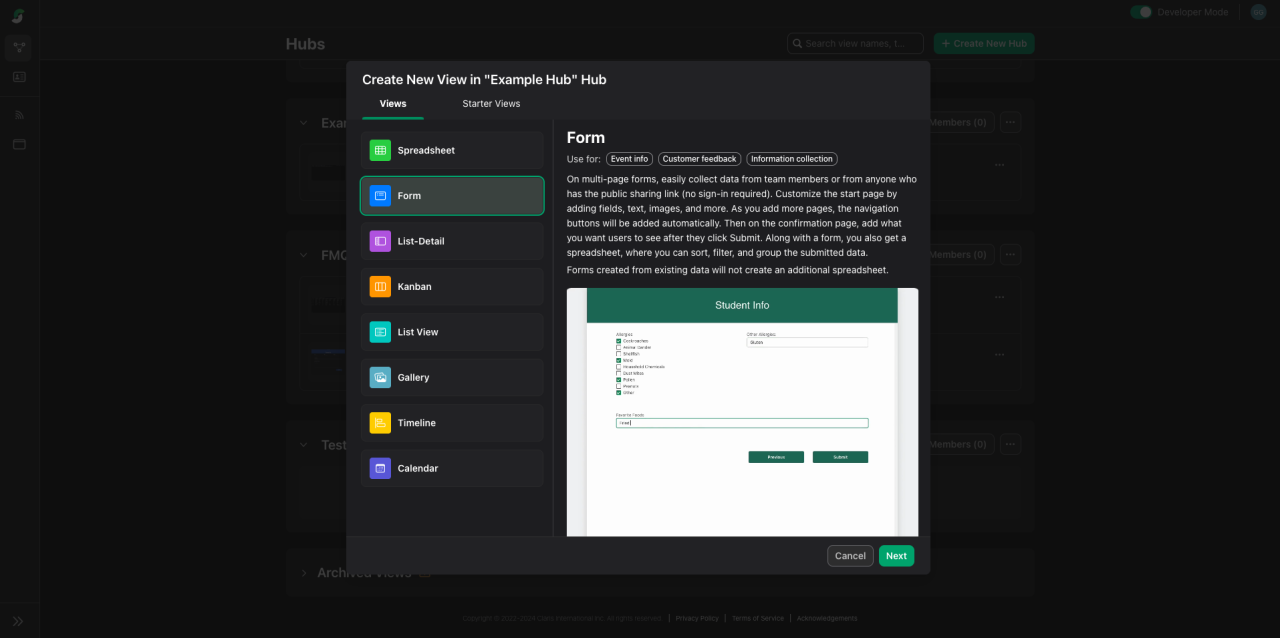
If you want to learn more about Claris Studio spreadsheets, you can go here for an in-depth look at all the options available. Now let's create the form we'll publish to the web. We'll need to start by repeating the process of creating a new view (reference above if needed), but this time, instead of choosing a spreadsheet view, we'll choose a "Form" view.
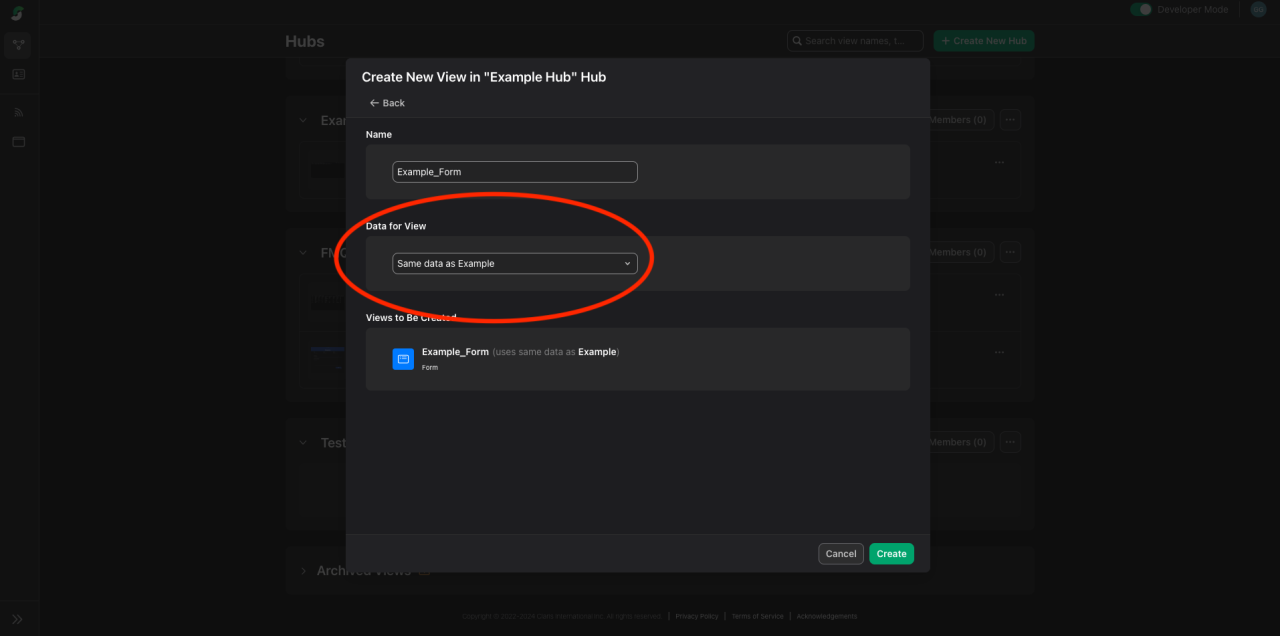
On the next page, we'll name our form. But this time, for the "Data for View" option, we'll select our spreadsheet and then click "Create."
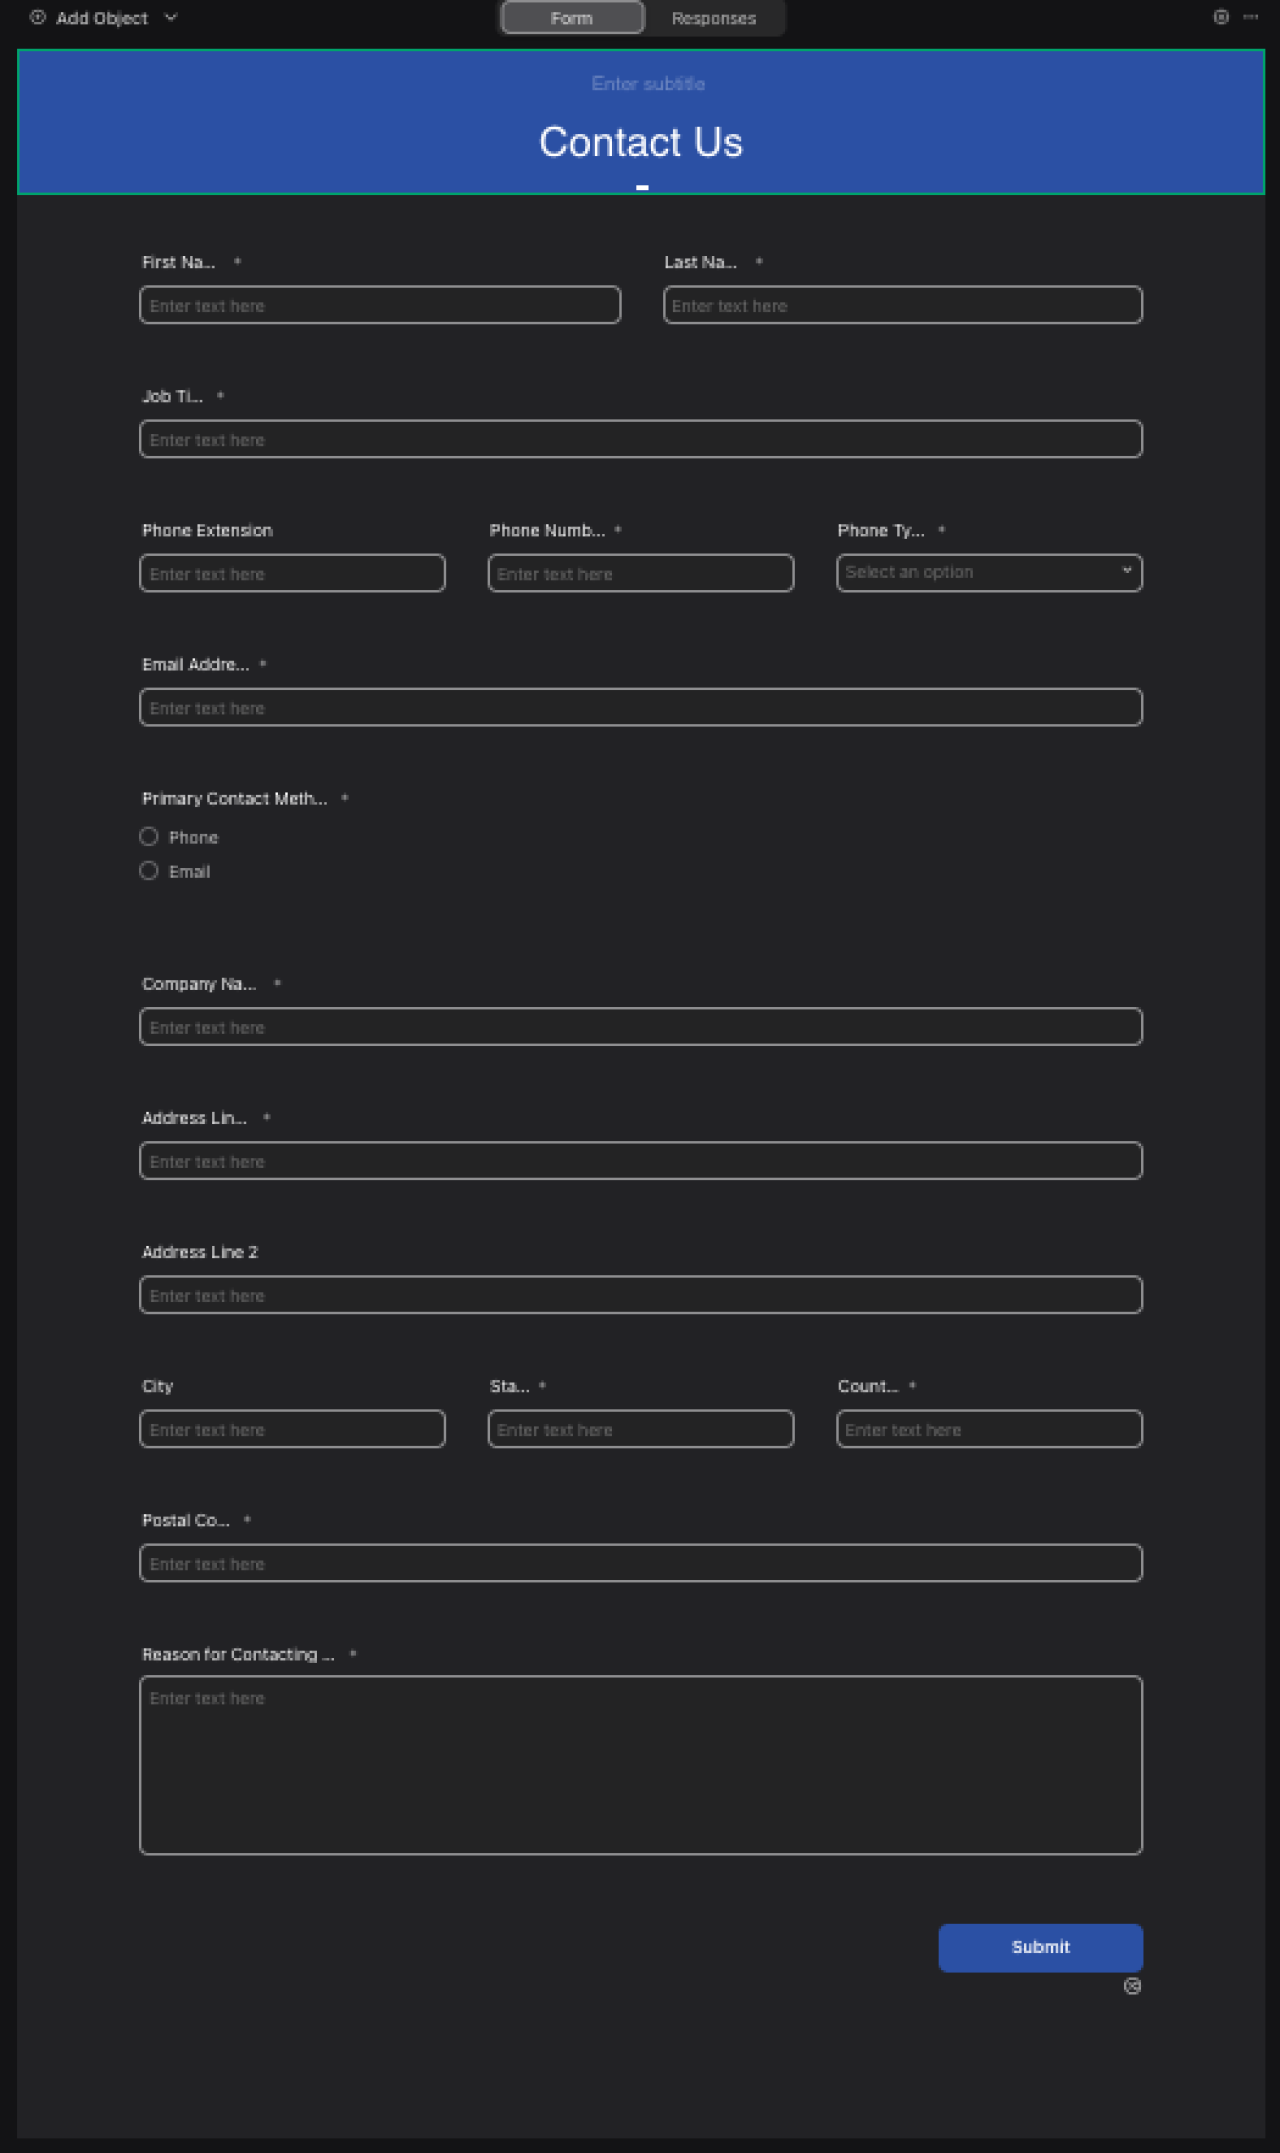
Once your form is created, you'll be presented with two pages right off the bat: the "Start Page" and the "Confirmation Page." We'll begin with the "Start Page." Since Claris Studio is a no-code platform, to customize how our page looks, we can simply drag and drop our fields where we want them. After adjusting how the page looks, here's what our final start page looks like.
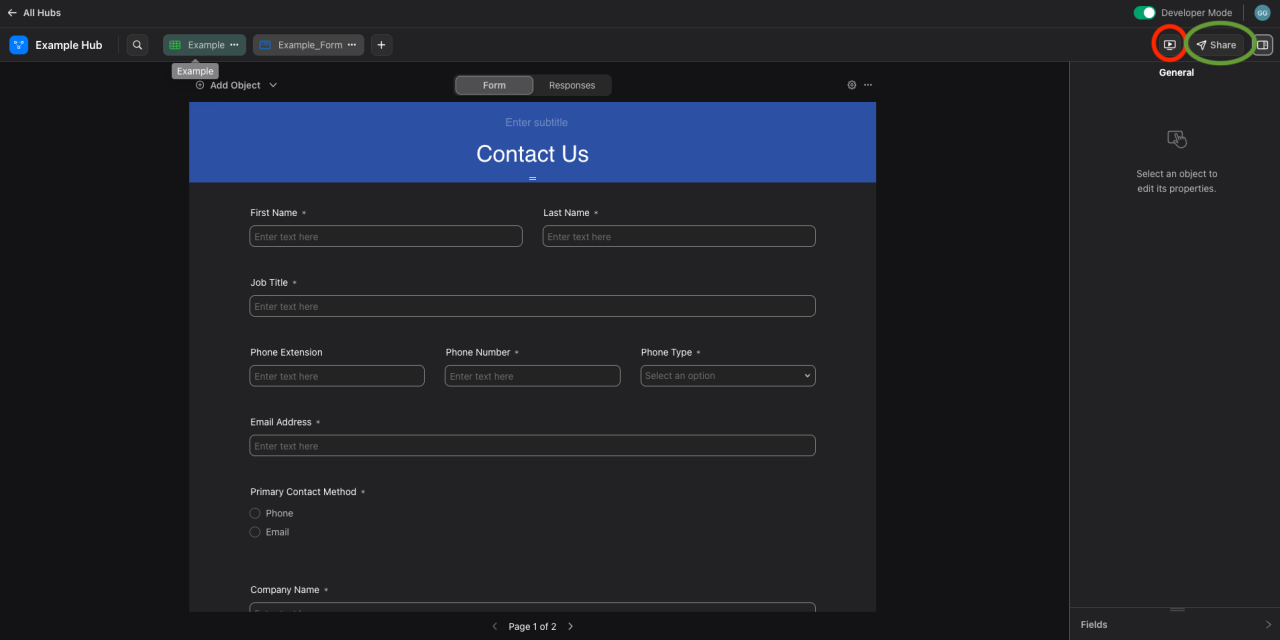
The next page in the workflow is the confirmation page, which will let your users know that they have submitted their form successfully. In order to view your form and submit data as users would, you can click on the open and submit data button (circled in red in the image below). The last step is to publish your form to the web so users can begin submitting data. You can do this by first clicking on the "share" button (circled in green in the image below) to pull up the "Public Sharing" window.
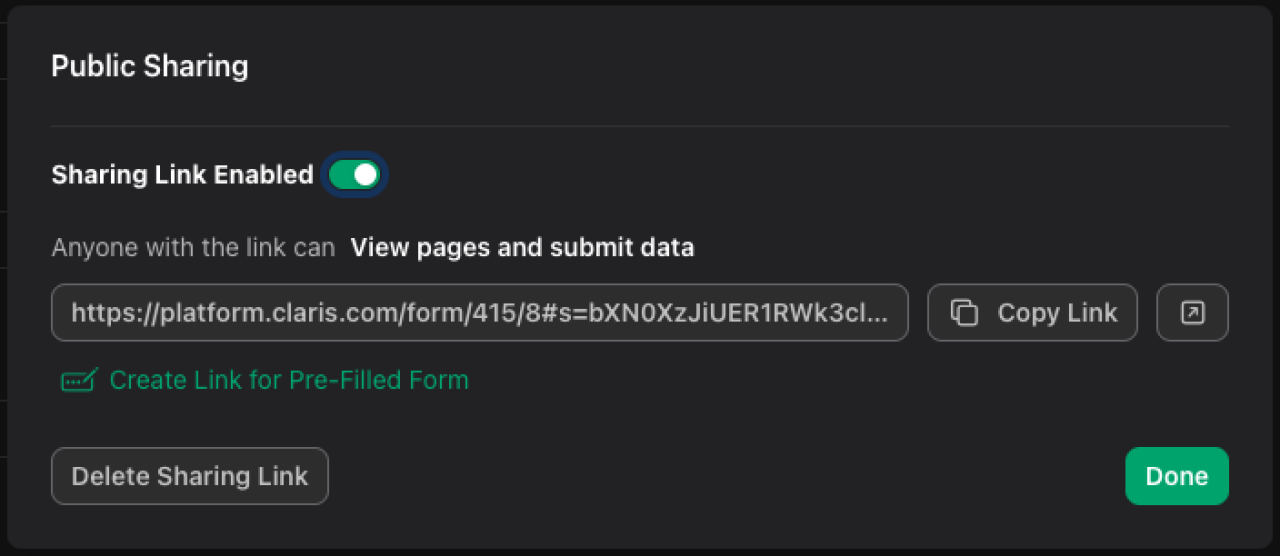
You will then want to enable the sharing link so your form can be viewed by the public, copy and save the link, and then click done.
We have created a Claris Studio spreadsheet to house our data and a form to collect our data, and we have shared the form to the web. Users can now visit that link, fill out the form, and submit the data to Claris Studio. The next step is to connect Claris Studio to FileMaker Pro.
Connecting Claris Studio to FileMaker Pro
Connecting Claris Studio to FileMaker Pro is a fairly straightforward process and should only take you a few minutes to do. There are a couple of necessary steps you must take before you can add Claris Studio data to your application. First, you must be running FileMaker Pro on version 20.2 or later in order to connect to Claris Studio. Next, you'll want to ensure you are signed in on FileMaker Pro using your Claris ID.
Once you complete both steps, you can open your application where you want to use Claris Studio data. Continuing from where we left off with our "lead" example, we will first open the relationship graph in FileMaker Pro. Then, we will add a new table to our graph.
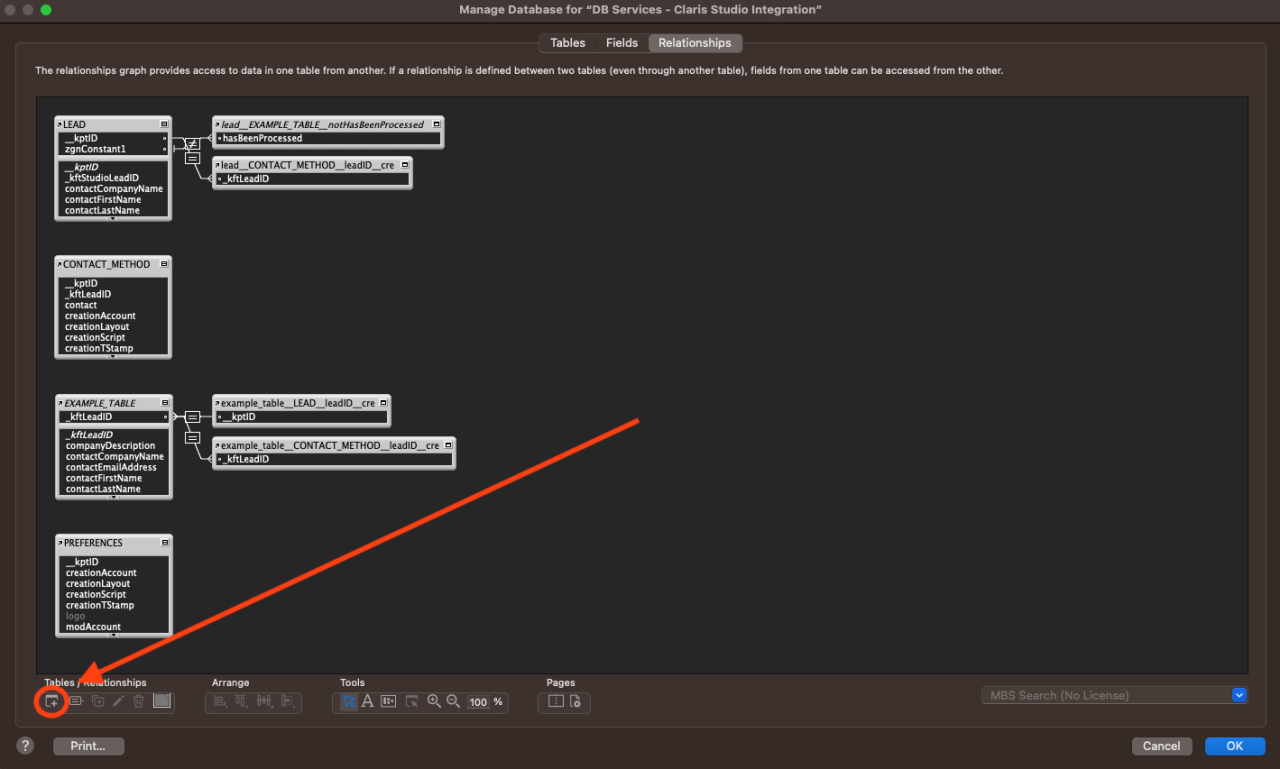
In the "Specify Table" dialog window, we'll click on "Data Source," and then click on the team name we created in Claris Studio.
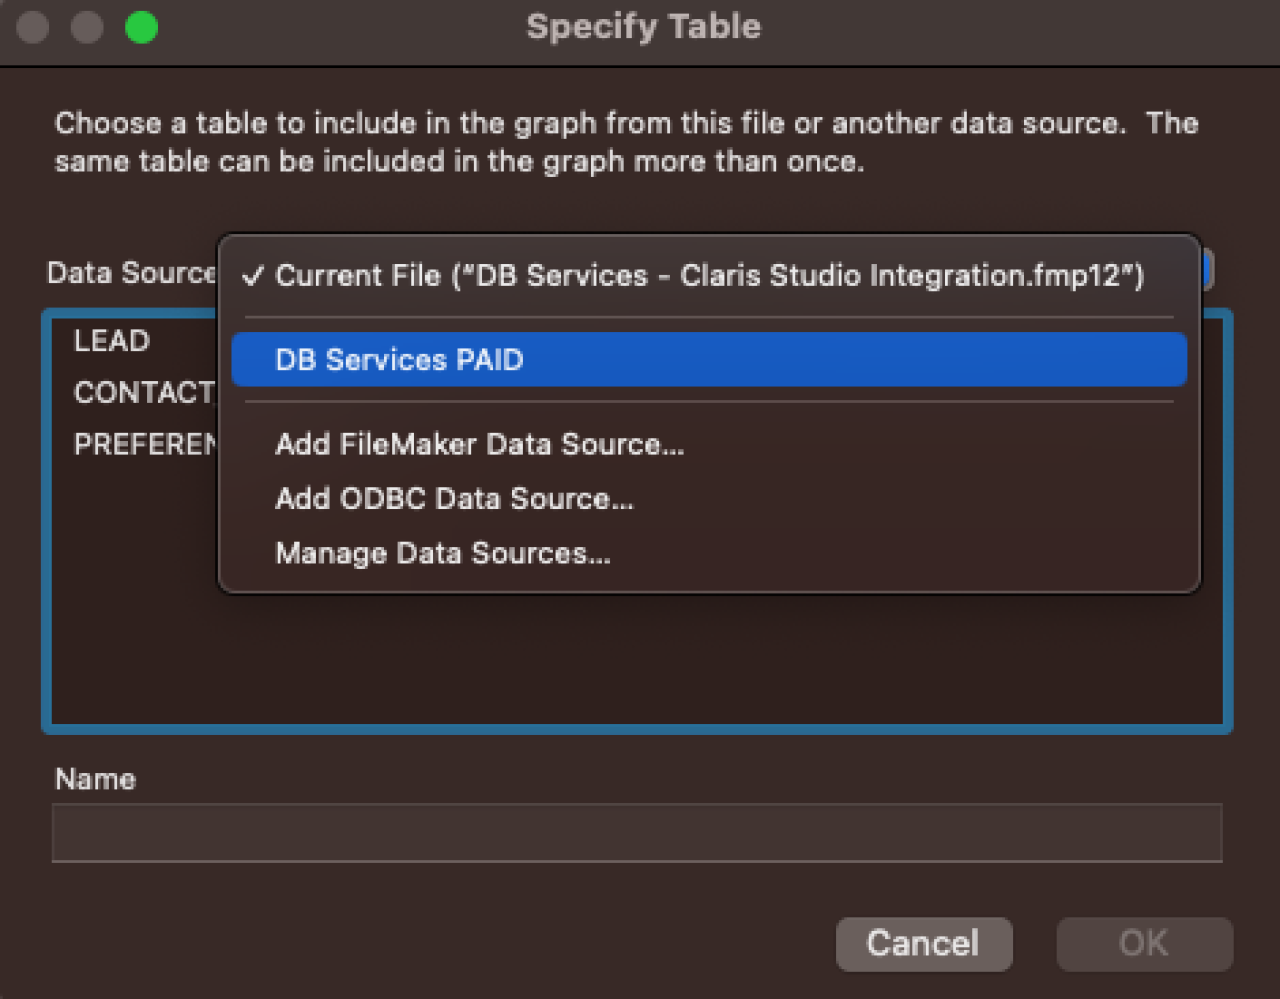
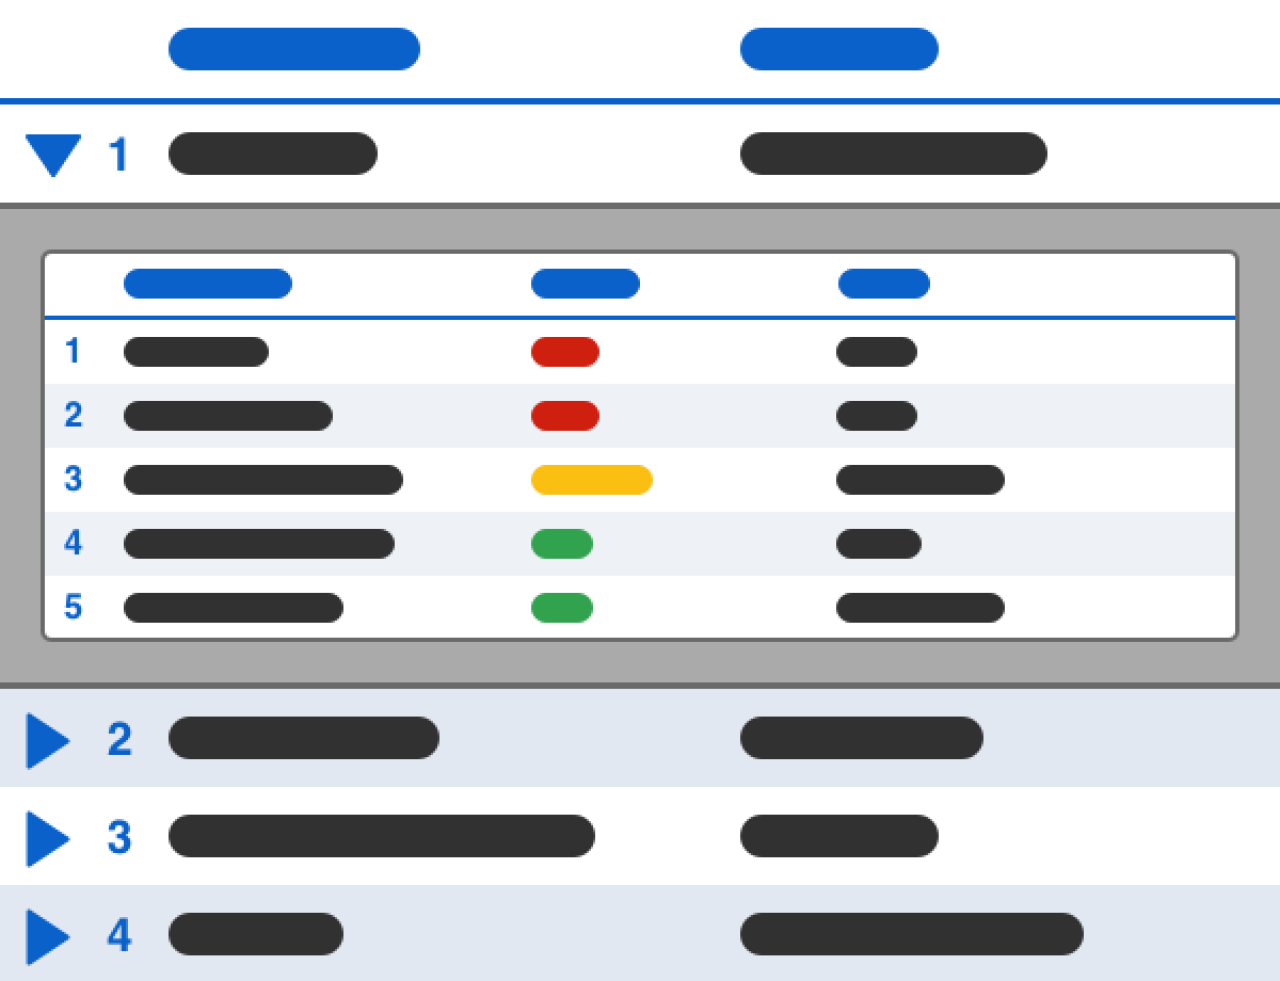
From here, we can select the Claris Studio spreadsheet we created and then click "OK." This will create a shadow table in FileMaker Pro, and the fields in this table will reflect those in Claris Studio. It's as simple as that! Once you have your shadow table in FileMaker Pro, you can create the necessary relationships and scripts based on your needs. You'll want to make sure the necessary fields from Claris Studio are on a layout that is based on your Claris Studio table context. The layout should look similar to the image below.
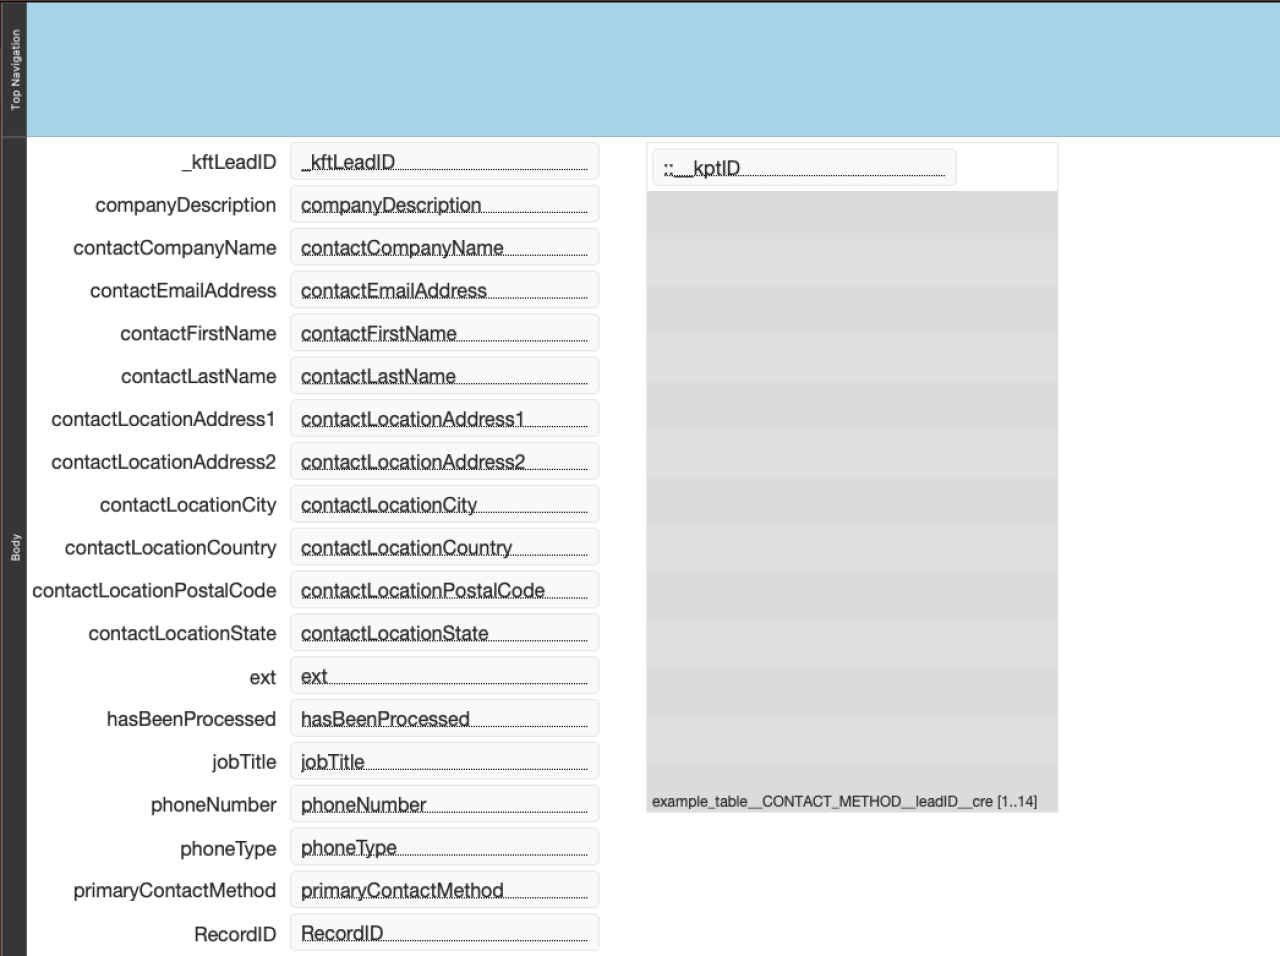
Something you might notice is that there is a "Record ID" field in our shadow table that we didn't add in Claris Studio. When you create a new spreadsheet in Claris Studio, it will automatically add this field for you and it serves as the primary key for that table.
I have also added a named portal (in this example, "PORTAL:ContactMethods") on this layout that is based on my relationship from our Claris Studio table to my "CONTACT_METHOD" table. You may not need this for your specific use case, and typically this is not necessary as we would create our contact methods through a transactional relationship. But since Claris Studio does not support global fields, it is necessary in this case.
Once our layout and relationships are set up, we can create our script for pulling our data from Claris Studio and putting it into FileMaker Pro. The tables, relationships, and scripts that you'll want to use to download your data from Claris Studio into FileMaker Pro are highly dependent on your specific use case.
We have included a sample file that you can download at the bottom of this article that includes a link to the form we have built in Claris Studio, as well as the necessary tables, relationships, and source code for downloading that data into FileMaker Pro. You can use this as a reference for building your own custom integration of Claris Studio and FileMaker Pro.
Conclusion
Claris Studio stands out as a dynamic tool, offering impressive capabilities that can transform your FileMaker Pro application. By seamlessly integrating Claris Studio, not only does data gathering become a breeze, but its intuitive interface and no-code functionalities elevate your business efficiency to new heights. Explore the possibilities of enhancing your FileMaker Pro application with Claris Studio, and if you're looking you guidance or support in this journey, feel free to contact us at DB Services. We're here to turn your vision into a reality!
Did you know we are an authorized reseller for Claris FileMaker Licensing?
Contact us to discuss upgrading your Claris FileMaker software.
Download the Claris Studio Forms in FileMaker Pro File
Please complete the form below to download your FREE FileMaker file.