
Amazon is the largest e-commerce site in the world, forcing brick-and-mortar stores to scramble to catch up online as it continues to grow its market share. While Amazon only holds a mere 5 percent share of total retail sales, excluding food, across the country, according to data from the U.S. Census Bureau, in 2016, Amazon posted revenue of 136 billion dollars compared to 107 billion in 2015, 27% year over year growth. Getting your business set up with Amazon is a great way to promote your products and boost your sales. It is never too late to jump on the sales freight train that is Amazon. We will demonstrate how you can streamline your operation by directly integrating your FileMaker solution with Amazon using Amazon Marketplace Web Service.
Creating a Developer Account
There are a few prerequisites you need to meet before you can continue. You can get all the information you need and more in the Amazon MWS Documentation. If you do not have a seller account, you will need to create one by registering at Amazon Services.
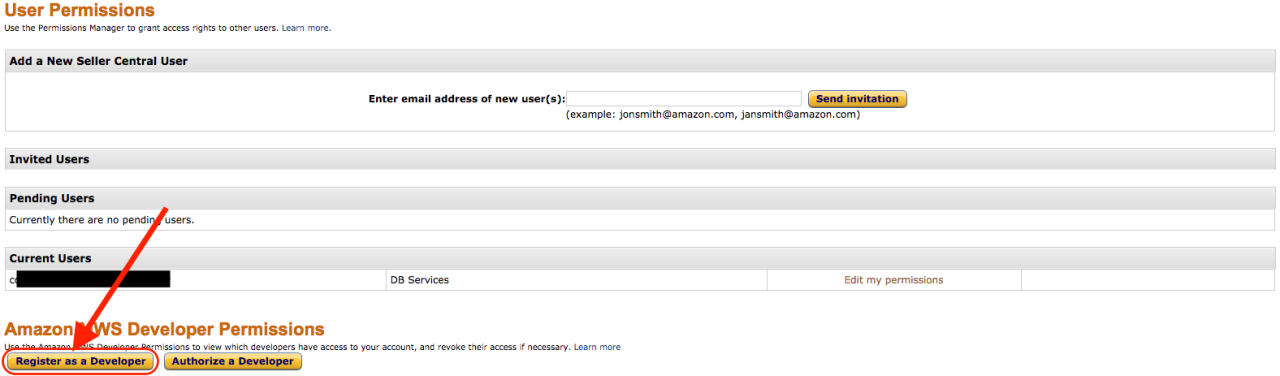
If you have what you need to register as a developer, log in and go to your User Permissions page. Click the Register as a Developer button, then follow the instructions. When you finish the process, you will then see your Seller ID (Merchant ID), Marketplace ID, AWS Access Key ID, and Secret Key. These are important for our integration and should be kept safe and secret.
Amazon MWS Signatures
Once you have your API information, you will need to authenticate your solution with the Amazon MWS API. Amazon requires you to add a signature to all requests to authenticate them. Please reference the documentation on signing requests. The main goal of the signature is to make sure the signature string matches what the API expects. The signature string is an encrypted concatenation of all request parameters, in alphabetical order. The authentication process can be quite tricky, so I highly recommend taking a look under the hood of the example file we have provided.
Set Variable [ $sigString ; Value: "GET" & Char (10) & $host & Char (10) & $api & Char (10) & $params ]
Set Variable [ $authCode ; Value: CryptAuthCode ( $sigString ; "SHA256" ; $secretKey ) ]
Set Variable [ $signature ; Value: Base64EncodeRFC ( 4648 ; $authCode ) ]
Making Requests and Parsing the Response
To send a request to the API, you will need to use the Insert from URL script step with FileMaker cURL options.
Set Variable [ $parameters ; Value: "AWSAccessKeyId=XXXX&Action=ListOrders&CreatedAfter=XXXX&MarketplaceId.Id.1=XXXX&SellerId=XXXX&SellerOrderId=XXXXX&SignatureMethod=HmacSHA256&SignatureVersion=2&Timestamp=XXXXX&Version=2013-09-01" ]
Set Variable [ $cURL ; Vaule: "-X POST --data " & $parameters ]
Insert from URL [ Select ; With Dialog: Off ; $result ; $url ; $cURL ; Do not automatically encode URL ]
Once a successful request has been made, an XML-encoded response will be returned. FileMaker does not have a native function for reading XML, so a plugin or a good custom function is needed to easily create and read XML sent or received from the API. I suggest using the BaseElements Plugin, as it is free and powerful, handling all of our XML needs. You will be able to use the function BE_XPath( ) to pull any information out of the response that you wish.
<?xml version="1.0" encoding="UTF-8"?>
<ListOrdersResponse xmlns="https://mws.amazonservices.com/Orders/2013-09-01">
   <ListOrdersResult>
      <Orders>
         <Order>
            <LatestShipDate>2017-08-19T04:48:48Z</LatestShipDate>
            <OrderType>StandardOrder</OrderType>
            <PurchaseDate>2017-09-01T17:06:50Z</PurchaseDate>
            <AmazonOrderId>XXX-XXXXXXX-XXXXXXX</AmazonOrderId>
            <BuyerEmail>XXXXXX@dbservices.com</BuyerEmail>
            <IsReplacementOrder>false</IsReplacementOrder>
            <LastUpdateDate>2017-09-01T05:10:11Z</LastUpdateDate>
            <NumberOfItemsShipped>1</NumberOfItemsShipped>
            <ShipServiceLevel>SecondDay</ShipServiceLevel>
            <OrderStatus>Shipped</OrderStatus>
            <SalesChannel>Amazon.com</SalesChannel>
            <IsBusinessOrder>false</IsBusinessOrder>
            <NumberOfItemsUnshipped>0</NumberOfItemsUnshipped>
            <PaymentMethodDetails>
               <PaymentMethodDetail>Standard</PaymentMethodDetail>
            </PaymentMethodDetails>
            <BuyerName>DB Services</BuyerName>
            <OrderTotal>
               <CurrencyCode>USD</CurrencyCode>
               <Amount>1.00</Amount>
            </OrderTotal>
            <IsPremiumOrder>false</IsPremiumOrder>
            <EarliestShipDate>2017-09-01T04:48:48Z</EarliestShipDate>
            <MarketplaceId>MARKET</MarketplaceId>
            <FulfillmentChannel>AFN</FulfillmentChannel>
            <PaymentMethod>Other</PaymentMethod>
            <ShippingAddress>
               <StateOrRegion>IN</StateOrRegion>
               <City>Indianapolis</City>
               <CountryCode>US</CountryCode>
               <PostalCode>46250</PostalCode>
               <Name>DB Services</Name>
               <AddressLine1>8604 Allisonville Rd</AddressLine1>
            </ShippingAddress>
            <IsPrime>false</IsPrime>
            <ShipmentServiceLevelCategory>SecondDay</ShipmentServiceLevelCategory>
            <SellerOrderId>XXX-XXXXXXX-XXXXXXX</SellerOrderId>
         </Order>
      </Orders>
      <CreatedBefore>2017-08-22T12:42:43Z</CreatedBefore>
   </ListOrdersResult>
   <ResponseMetadata>
      <RequestId>XXXXXXXX-XXXXX-XXXX-XXXX-XXXXXXXXXX</RequestId>
   </ResponseMetadata>
</ListOrdersResponse>
For example, you can get the Amazon Order Id by using the following:
Set Variable [ $n ; Value: 1 ]
Set Variable [ BE_XPath ( $result ; "/ns:ListOrdersResponse/ns:ListOrdersResult/ns:Orders/ns:Order[" & $n & "]/ns:AmazonOrderId" ; "ns=https://mws.amazonservices.com/Orders/2013-09-01") ]
The $n variable is used to get the nth order in the list. In the example provided, there is only one order; however, if your result contains multiple orders, you will need to change $n to the nth number.
Amazon Feeds: Acknowledging and Shipping an Order
The above example is based on the Order API. That will give you the basic information on your orders. Once you are ready to acknowledge or ship an order, you will need to use the Feeds API. The Feeds API will not automatically process your request and give you the results of your request, so communicating with this API requires two steps:
Make a request to the Feed API and grab the Feed Submission ID.
Continuously query the Feed API using the Feed Submission ID to retrieve the results of your original request.
This means that once you have submitted your original request, Amazon will either acknowledge receipt of a valid request and provide you with a request ID to track, or it will respond with an immediate error.
<?xml version="1.0" encoding="UTF-8"?>
<SubmitFeedResponse xmlns="http://mws.amazonaws.com/doc/2009-01-01/">
   <SubmitFeedResult>
      <FeedSubmissionInfo>
         <FeedSubmissionId>50002017409</FeedSubmissionId>
         <FeedType>_POST_ORDER_ACKNOWLEDGEMENT_DATA_</FeedType>
         <SubmittedDate>2017-08-31T11:56:14+00:00</SubmittedDate>
         <FeedProcessingStatus>_SUBMITTED_</FeedProcessingStatus>
      </FeedSubmissionInfo>
   </SubmitFeedResult>
   <ResponseMetadata>
      <RequestId>15e66ef4-6306-4a1b-9712-20d9ee6d9b16</RequestId>
   </ResponseMetadata>
</SubmitFeedResponse>
If you sent a valid request, you will then have to wait and continuously query the Feeds API with your Feed Submission ID. Amazon will then respond with try again, error, or success response.
<?xml version="1.0" encoding="UTF-8"?>
<AmazonEnvelope xmlns:xsi="http://www.w3.org/2001/XMLSchema-instance" xsi:noNamespaceSchemaLocation="amzn-envelope.xsd">
    <Header>
        <DocumentVersion>1.02</DocumentVersion>
        <MerchantIdentifier>XXXXXXXXX</MerchantIdentifier>
    </Header>
    <MessageType>ProcessingReport</MessageType>
    <Message>
        <MessageID>1</MessageID>
        <ProcessingReport>
            <DocumentTransactionID>XXXXXXXXX</DocumentTransactionID>
            <StatusCode>Complete</StatusCode>
            <ProcessingSummary>
                <MessagesProcessed>1</MessagesProcessed>
                <MessagesSuccessful>1</MessagesSuccessful>
                <MessagesWithError>0</MessagesWithError>
                <MessagesWithWarning>0</MessagesWithWarning>
            </ProcessingSummary>
        </ProcessingReport>
    </Message>
</AmazonEnvelope>
Conclusion
Following the steps above, you can integrate your FileMaker solution with Amazon and streamline your workflow. Feel free to contact us if you need further assistance or would like to discuss integrating your Amazon account with FileMaker.
Did you know we are an authorized reseller for Claris FileMaker Licensing?
Contact us to discuss upgrading your Claris FileMaker software.
Download the FileMaker Amazon Marketplace Integration File
Please complete the form below to download your FREE FileMaker file.