We all have files and they all have to be saved somewhere. For over a billion people, that somewhere is Google Drive. Google Drive is a top choice for file and content sharing if you're looking for ease of access, safety, privacy, and seamless collaboration. If you're interested in using Claris FileMaker to seamlessly share files to and from Google Drive, we have just the integration for you!

Creating a Free Developer Account
To use the Google Drive APIs, you’ll need to create a project space in the Google Developer’s Console by going here and following these instructions:
From the dashboard, create a project. Once you’ve named and saved it, you’ll need to enable the APIs and Services that you need. There’s an aptly named button for that. Use the search field in the center of the screen, and then select the Google Drive API from the results. Enable it.
At this point, you should now be on the overview screen. You’re going to need to set up all the specifics of your connection, so click the button for “Create Credentials”. There are five steps to this that you’ll need to complete:
Make sure you have the Google Drive API selected, and that you select “User data” as the type of data you will be accessing, then click “NEXT”.
For “Your Credentials”, enter an app name (might I suggest “FileMaker”?) and your email address in the two appropriate fields, before saving and continuing.
“Scopes” can be very important, but this is just a demo. Save and continue.
Your OAuth Client ID. This one is important. FileMaker will use HTTP requests to connect to Google Drive, so for this one, select “Web Application”. Give your application a name. Then, add an authorized redirect URI, and paste in this address "https://dbservices.com/Authentication/FileMaker%20Google%20Drive%20Integration/Pull-Code" before hitting “Create”.
You now have a client ID. Hit done.
You’ve just created your OAuth 2.0 Client ID. It contains several pieces of information that you need to gather and give to FileMaker, but more on that in a minute.
On the navigation list to the left, click on "OAuth consent screen". Right now, your integration is locked in an internal testing mode. You've got two choices on how to proceed:
Click the button to "Publish App".
Click the button to "Add Users" under Test users, and add your email address.
Once you've made your choice, move back to the Credentials screen and then click the pencil icon in the Actions column. In the top right corner of the screen, you should see your Client ID and your Client Secret. FileMaker is going to need both of these values to connect to Google.
Finally, we get to FileMaker!
Open our demo file and confirm that you’ve followed all the steps necessary to set up your Google project. Check off the steps as you go. For the final step, plug in the values for Client ID and Client Secret before clicking the Go To Example button.
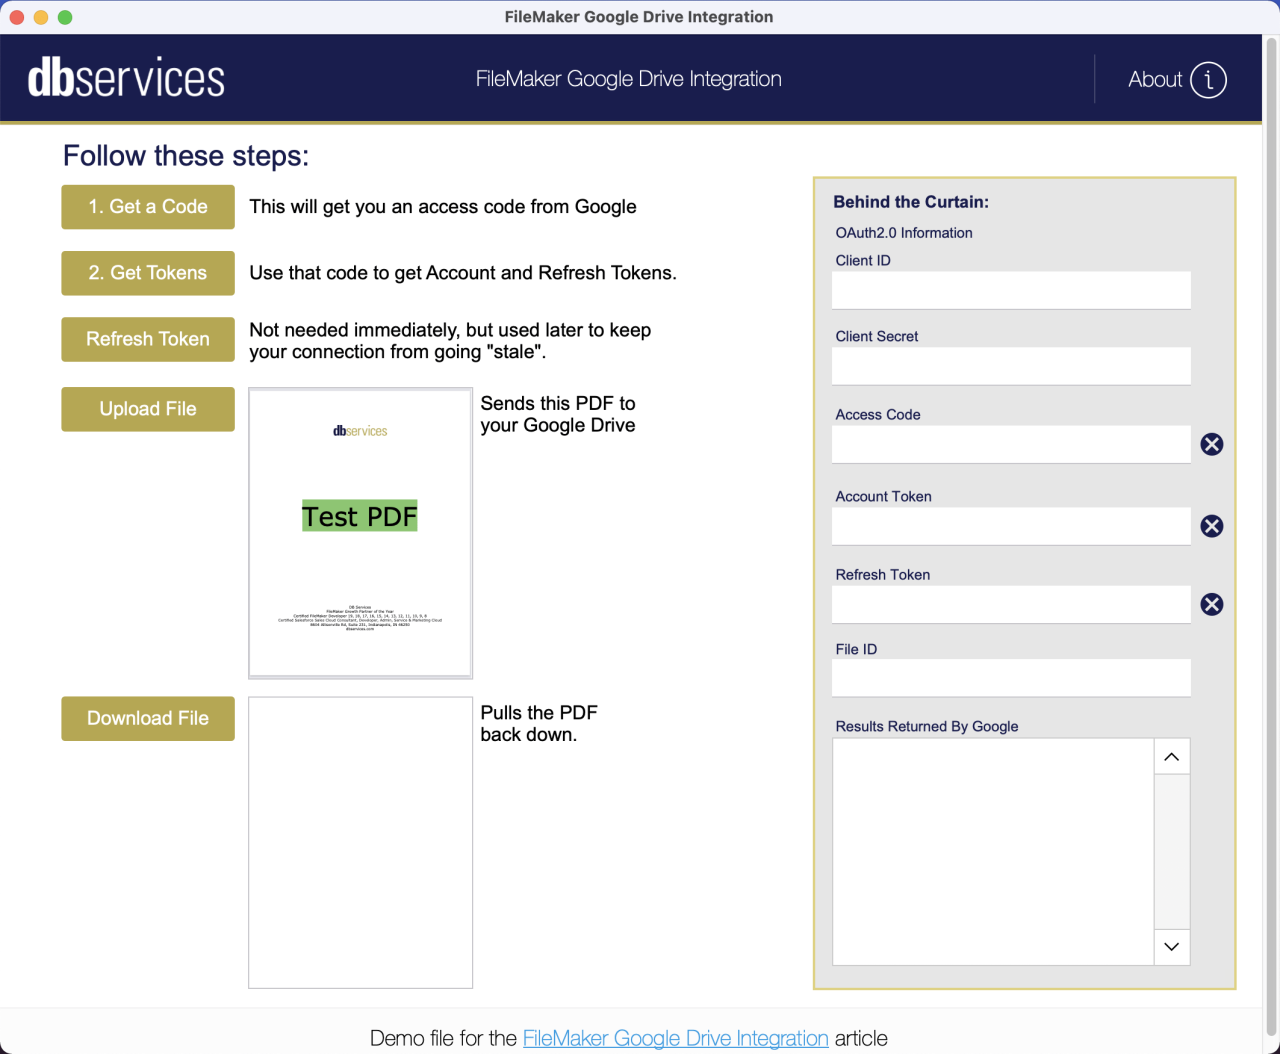
Everything that we will need to do to accomplish this demo is handled by the gold buttons on the left side of the screen. If you’re curious about the “hows”, you can check out the values found in the “Behind the Curtain” box.
Begin by clicking button 1 and requesting an access code from Google. FileMaker will use the Open URL script step to reach out to the Google API and request access to your account. Thankfully, Google is not a trusting sort, though. A browser window should open and Google will first ask you to verify your Google account, and then make sure that you trust FileMaker to do your bidding. If you say yes, Google will send you back an access code.
You can now click on button 2. Using the information that we’ve collected so far, we’ll reach out to Google again to request back two new codes: a limited-time access token for making additional requests, and a refresh token. As our time limit runs out, the refresh token will make it easier to get a new access token without going through all the steps we did to get our first one.
So now we reach the whole point of the demo. Click on the Upload File button and see the magic. A few seconds go by and…nothing happens. Unless you looked at the “Results Returned By Google” field in Behind the Curtain. Google has given us back a JSON result, describing the file that it received. For the skeptics among us, log into your Google Drive and confirm that the Test PDF file is now there.
But like any good magic trick, it’s not just about making something go someplace else. You have to bring it back. So for our final step, click on the Download File button and watch as the file reappears.
Conclusion
And with that, we conclude the simple demonstration of our FileMaker integration with Google Drive. If you are like me, you are probably getting ready to take apart our completely unlocked sample file and break it down for yourselves. That's okay. We welcome it.
At DB services, we love FileMaker, and we love helping our customers get the most out of it! Connecting FileMaker to Google Drive is just one of the ways that we can assist you. Please feel free to contact us if you need further assistance integrating Google Drive with your FileMaker solution, or if you would like to talk about how we can help you be even more successful with FileMaker.
Did you know we are an authorized reseller for Claris FileMaker Licensing?
Contact us to discuss upgrading your Claris FileMaker software.
Download the DB Services - FileMaker Google Drive Integration File
Please complete the form below to download your FREE FileMaker file.

