Intuit's QuickBooks Online is a powerful tool for managing invoices, payments, and other accounting tasks. At the end of the year, Intuit announced that it would have over 2.55 million subscribers. Many companies have both QuickBooks and FileMaker and have to do double data entry from one system to the next. We will demonstrate how integrating your FileMaker solution with QuickBooks Online can eliminate the hassle of manually copying the information.
Creating a Free Intuit Developer Account
The first step of this integration is to create an Intuit developer account. Once you have an account, you must create a new QuickBooks Online app by navigating to the My Apps page. This will take you to a setup process where you select the API you will use. To start, click the Select APIs button under the "Just Start Coding" section. You must then select the Accounting box and click the Create App button.
Now that you have created the QBO App, you need to set it up and obtain your keys. First, navigate to the settings page for your app. Here, you can change the name and other app options. You must set the Redirect URL to https://dbservices.com or any valid website. This is only used as a landing page for authentication and does not require any special features. Now that the launch URL is set, navigate to the Keys page. There, you will need to copy the Client ID and Client Secret into your solution. Keep your secret hidden from the world, as the combination of the ID and Secret will authorize your solution to make changes to the end user's QuickBooks.
If you don't have access to a QuickBooks company that already exists, you need to be invited by the administrator to become an accountant. Ask the admin to log in to QuickBooks Online, click Company, Manage Users, and Invite Accountant. You will receive an email with a link to connect your developer account to the company.
Authenticating with QuickBooks Online Using OAuth 2.0
*Note: As of July 17, 2017, QuickBooks Online uses OAuth 2.0 for all new apps.
Once you have your API information, you must authenticate your solution with the QuickBooks Online Accounting API. Please refer to the QuickBooks Online Accounting API Documentation for any questions regarding how requests should be constructed. To authenticate your solution, please reference the documentation on OAuth 2.0. Place the user as a web viewer on the API authentication screen to authenticate your solution. This will prompt the user to log in with their own account and allow your solution to change their QuickBooks.
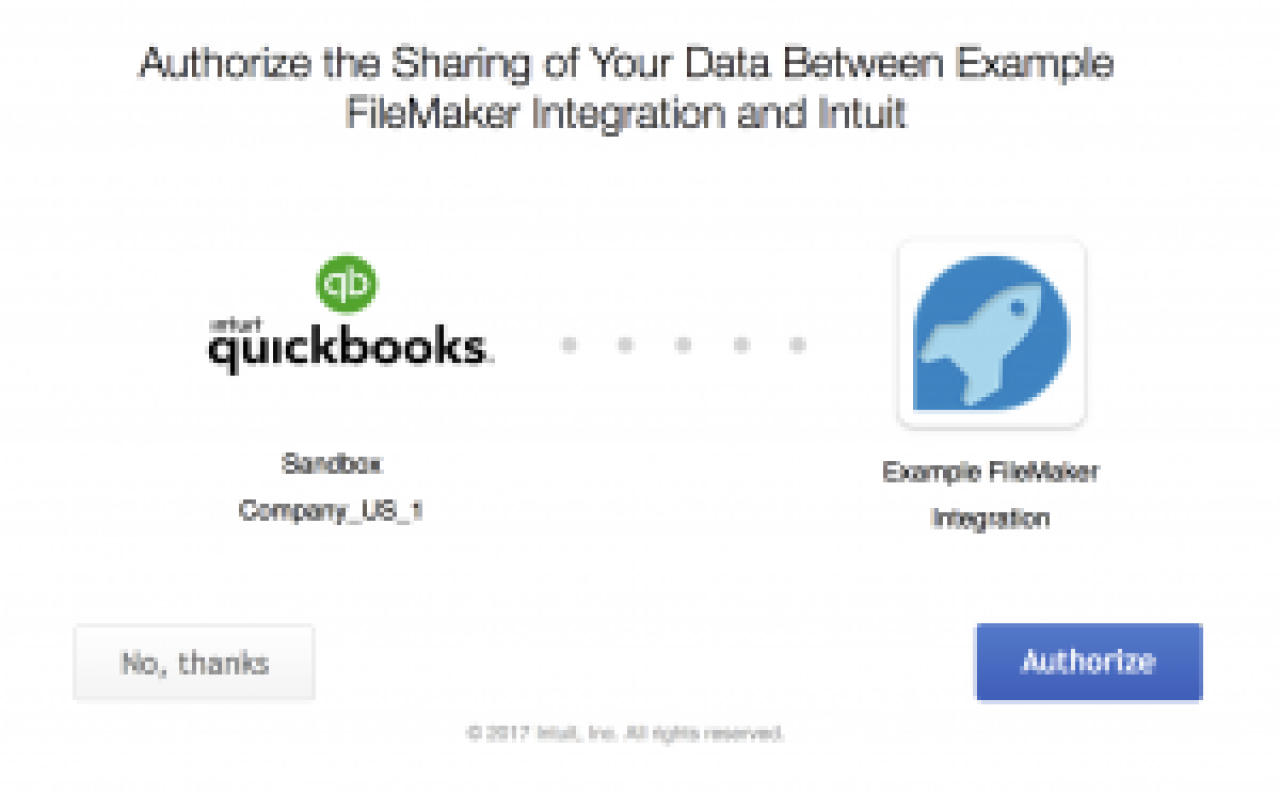
Once they have agreed, they will be sent to the address specified in your Redirect URL. The address will contain URL-encoded parameters, one of which will be the code and another the realm ID (QuickBooks Company ID). You will then use the code provided, along with your ID and secret, to obtain your access token, which will be used to make any API requests.
Making Requests and Parsing the Response
Many QuickBooks Online API requests require additional parameters outside the URL-encoded parameters. The Create Customer request, for example, is a POST request that requires additional fields, such as the company, billing address, and various other customer settings. These extra fields will need to be passed as JSON-encoded text parameters.
Insert from URL [ Select ; With Dialog: Off ; $result ; "https://quickbooks.api.intuit.com/v3/company/[Realm ID Here]/customer" ; $cURL ; Do not automatically encode URL ]
A JSON-encoded response will be returned once a successful request has been made. You can then use the JSONGetElement () function to pull any information out of the response you wish.
{
  "Customer": {
    "Taxable": true,
    "BillAddr": {
      "Id": "1",
      "Line1": "8604 Allisonville Road",
      "Line2": "Suite 231",
      "City": "Indianapolis",
      "Country": "USA",
      "CountrySubDivisionCode": "IN",
      "PostalCode": "46250"
    },
    "Notes": "Some notes can go in here!",
    "Job": false,
    "BillWithParent": false,
    "Balance": 0,
    "BalanceWithJobs": 0,
    "CurrencyRef": {
      "value": "USD",
      "name": "United States Dollar"
    },
    "PreferredDeliveryMethod": "Print",
    "domain": "QBO",
    "sparse": false,
    "Id": "1",
    "SyncToken": "0",
    "MetaData": {
      "CreateTime": "2017-03-20T13:55:13-07:00",
      "LastUpdatedTime": "2017-03-20T13:55:13-07:00"
    },
    "GivenName": "Brendan",
    "FamilyName": "McBride",
    "FullyQualifiedName": "Database Services",
    "CompanyName": "DB Services",
    "DisplayName": "Database Services",
    "PrintOnCheckName": "DB Services",
    "Active": true,
    "PrimaryPhone": {
      "FreeFormNumber": "(317) 288-4244"
    },
    "PrimaryEmailAddr": {
      "Address": "consulting@dbservices.com"
    },
    "DefaultTaxCodeRef": {
      "value": "2"
    }
  },
  "time": "2017-03-20T13:55:13.630-07:00"
}
For example, you can get the newly created customer ID by using the following set of functions:
Set Variable [ JSONGetElement ( $result ; "Customer.Id") ]
Sandbox QuickBooks Company
When you create a developer account, you will be given a sandbox QuickBooks Online company for testing. This allows you to test your integration without fear of deleting or modifying anything in your live QuickBooks company account. If you go to the My Apps Dashboard and enter your app, you will notice that you are in the Development section by default. If your integration is ready to go live, you must go into the Production section. Here, you will set up your production settings and then submit your request. You will then be given a production consumer key and secret.
Roles
Assign roles to people on your QuickBooks Online plan to define what they can see and do with your company data. Each email address on your plan is assigned a role. Below are lists of the billable and non-billable roles in Intuit QuickBooks Online.
Note: This section was added in 2025 to cover new QuickBooks Online Integration plan role updates.
Billable Roles
The following roles count toward your user limit.
Standard All Access: Users added in this role have full access without admin privileges and access to Payroll.
Standard No Access: Users assigned to this role have limited permissions; they can submit their own timesheets but cannot access accounting features.
Accounts Receivable Manager: Users assigned to this role can view and access sales, customers, and A/R reports. (This role was previously called Standard Limited Customers Only.)
Accounts Payable Manager: Users assigned to this role can view and have full access to expenses, vendors, and A/P reports. (This role was previously called Standard Limited Vendors Only.)
Standard Limited Customers and Vendors: Users assigned to this role can view and access all features related to Customers and Sales, as well as Vendors and Expenses.
In-House Accountant: Users assigned to this role can access reporting, bookkeeping, and accounting features, while restricting Access to Payroll and administrative tasks, such as user management. (This role was previously called Standard All Access without Payroll.)
Company Admin: Users assigned to this role can view and perform all actions, including sending money, changing passwords, and adding users. Please note that not everyone should be made an admin.
Nonbillable Roles
The following roles do not count towards your user plan limit
Track Time Only: Users assigned to this role can submit their own timesheets.
Take Payments - Created by Self: Users assigned to this role can process payments using the QuickBooks GoPayment app, but they do not have access to other areas of your QuickBooks company.
Take Payments - All: Users assigned to this role can process payments using the QuickBooks GoPayment App, but they will not have access to other areas of your QuickBooks company.
QuickBooks Online: Things to Keep In Mind
There are several essential items to keep in mind when working with the QuickBooks Online API. Here are a few points to look out for when integrating your FileMaker solution with QuickBooks Online:
The QBO API uses SyncTokens to update existing records. A SyncToken is a mechanism for locking a record. The request will fail if you do not pass the expected SyncToken when making an update.
Specific tables in QuickBooks require other related records to exist already. For example, when adding an invoice to QuickBooks, the customer assigned to the invoice needs to exist in QuickBooks before the invoice can be created.
You can also use Webhooks to have QuickBooks Online automatically update FileMaker.
QuickBooks Online integration with FileMaker differs significantly from QuickBooks Desktop integration with FileMaker.
QuickBooks Online integration with FileMaker does not require a plugin; everything is done natively.
Conclusion
QuickBooks Online can be fully integrated with your FileMaker solution! You can create, update, query, or delete just about any QuickBooks entity you would like, all from within FileMaker. Automate your accounting processes, eliminate duplicate data entry, and minimize human errors. Feel free to contact us for further assistance or to discuss integrating your QuickBooks system with FileMaker.
Did you know we are an authorized reseller for Claris FileMaker Licensing? Contact us to discuss upgrading your Claris FileMaker software.
Download the FileMaker QuickBooks Online Integration File
Please complete the form below to download your FREE FileMaker file.