
When it comes to sending important legally binding documents, no application does it as well as SignNow. With over 28 million users in more than 20 different industries using the enterprise-grade eSigning platform, it's no wonder so many businesses rely on it. This guide will show you how you can begin sending customized documents, as we walk you through this jam-packed tutorial. Integrating SignNow with your FileMaker solution makes sending virtual documents an easy task.
SignNow Setup
Before you start sending documents, you will need to create a SignNow account. For this tutorial, we will use a developer sandbox account. Once you have familiarized yourself with the integration features, you can move on to the production version. Remember the production version is not free. There is a free trial version, but you need to pay based on how many signatures/documents you are sending on a monthly basis.
Once you have created an account, you want to go to the API settings page. To navigate there, go to the bottom-left of the navigation menu and click on API. Then you will appear on the API key settings page below.
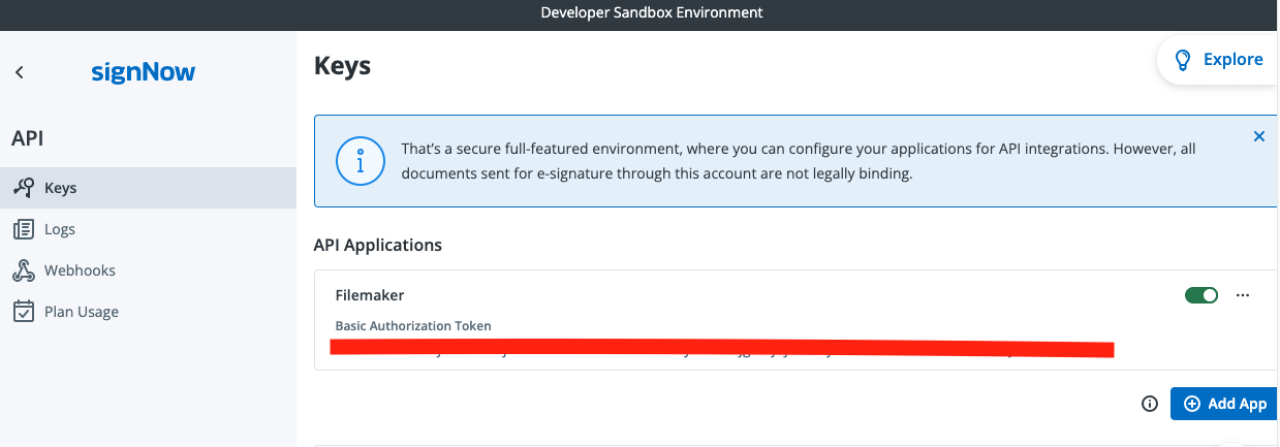
Once you are here, click on the blue button "Add App" to add a new API key. This will generate the basic token we need to copy and paste into our FileMaker application. Be sure the toggle is green, which ensures the API key is active.
Next, open up your FileMaker application and enter the required information. We need the API URL, the basic token, and the login username and password. For this example, we are using the sandbox environment, so the API URL is: https://api-eval.signnow.com, but once you are ready for production, you can use the API URL: https://api.signnow.com.
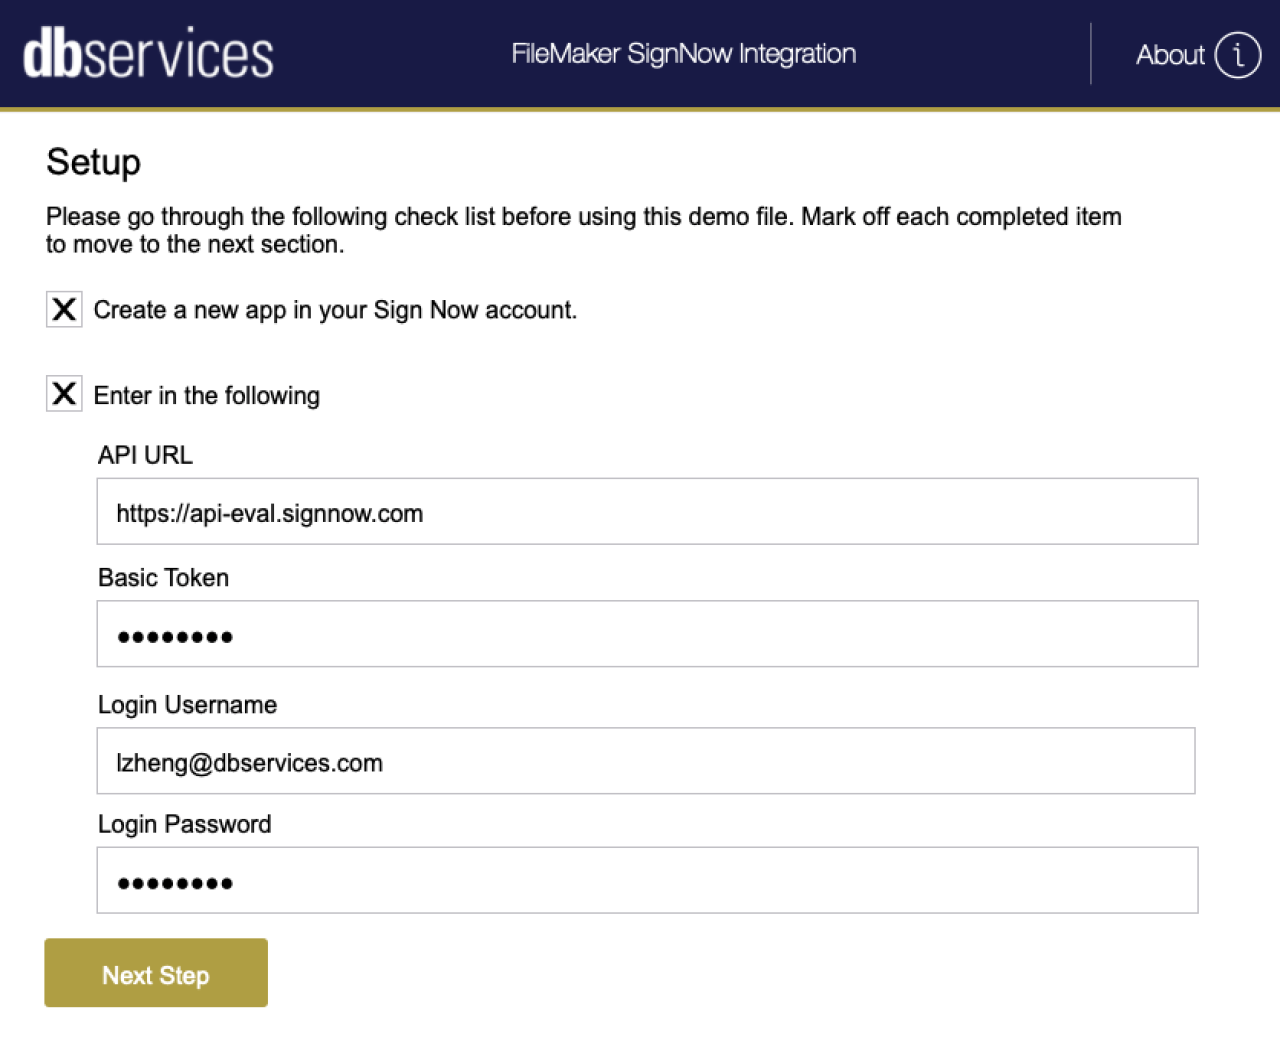
The login username and password are from the SignNow account that you just created, and the basic token is the one you generated from the API settings page. Once all this information is filled in, you can proceed to the next step: getting the access and refresh token. Just click on the "Get Access & Refresh Token" to generate the tokens needed for all our API calls. We are now ready to create templates.
Create Templates
Instead of storing templates in SignNow, we are adding the ability to store the templates in FileMaker. This will give you more power as a user to customize the templates and save them all in the same location.
Usually, when you want a template, you would have to go to SignNow, add a template, and add the customized smart fields like the signature, date, and more, then pull the template ID from SignNow into FileMaker. This process is fine, but it doesn't give you as much control. Let's dig into why.
Hit the "New Template" Button to go to the template setup page below.
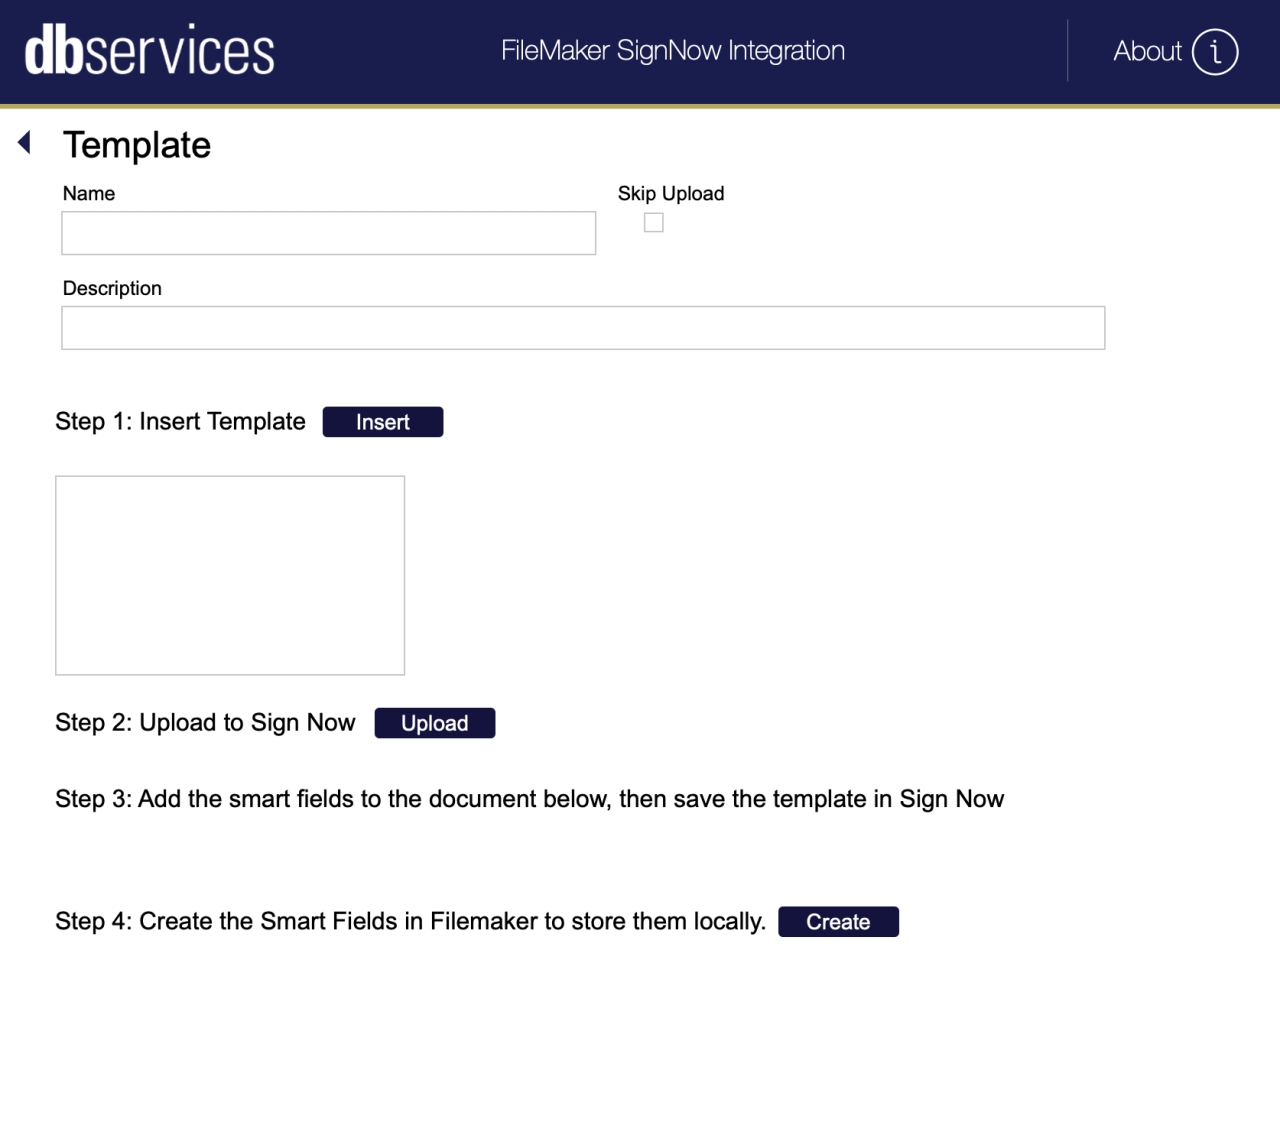
Here, you can enter the basic info like the name of the template and the description. The skip upload button allows you to override the template upload to SignNow so you can manually add the smart fields that will appear on the template document. We would advise not using that option unless you know the exact dimensions and location (down to the pixel) of where you want certain fields to show.
Add all the basic info, then start going down from step 1 to step 4. In step 1, you want to insert the document that you will be using as a template. Hit Insert to insert a PDF or a Word document file.
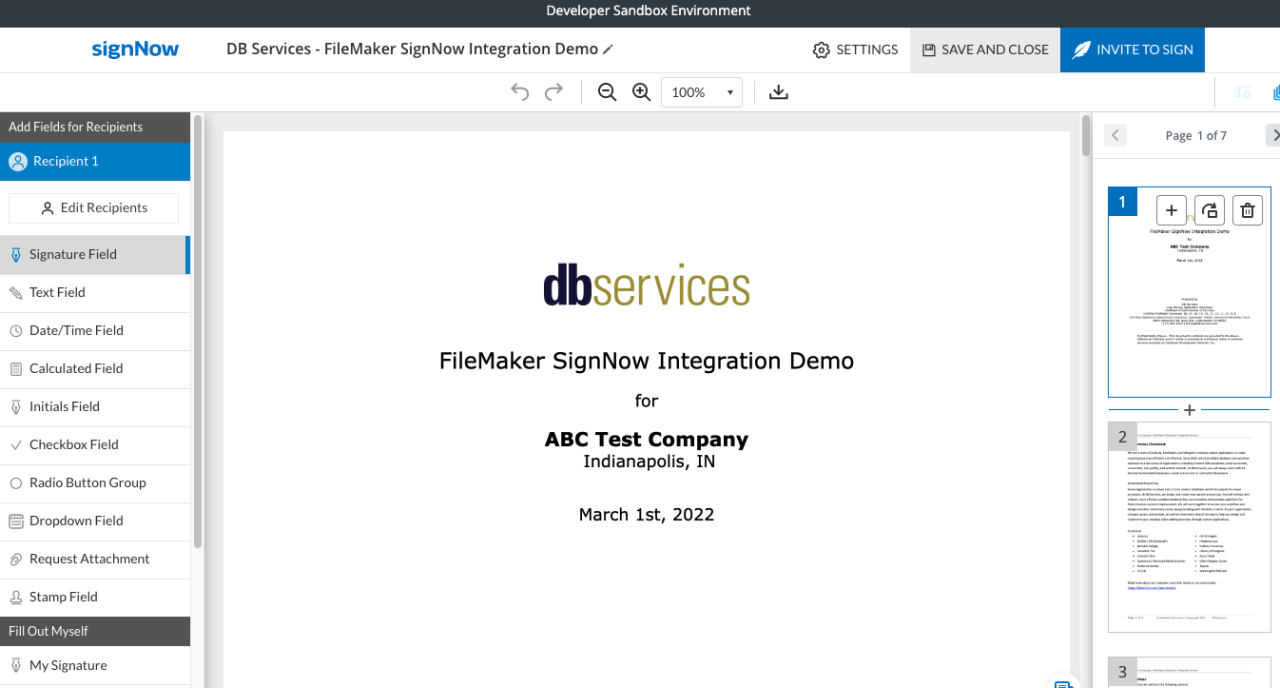
In step 2, hit the Upload to SignNow button to upload the template to SignNow. Remember, you need to have already logged in to your SignNow account because this step automatically opens up the webpage URL to the template document for you to add the smart fields. See image below.
If you have not done so, the webpage will fail to load. You can always click on the generated link to open up the webpage if you need to go back.

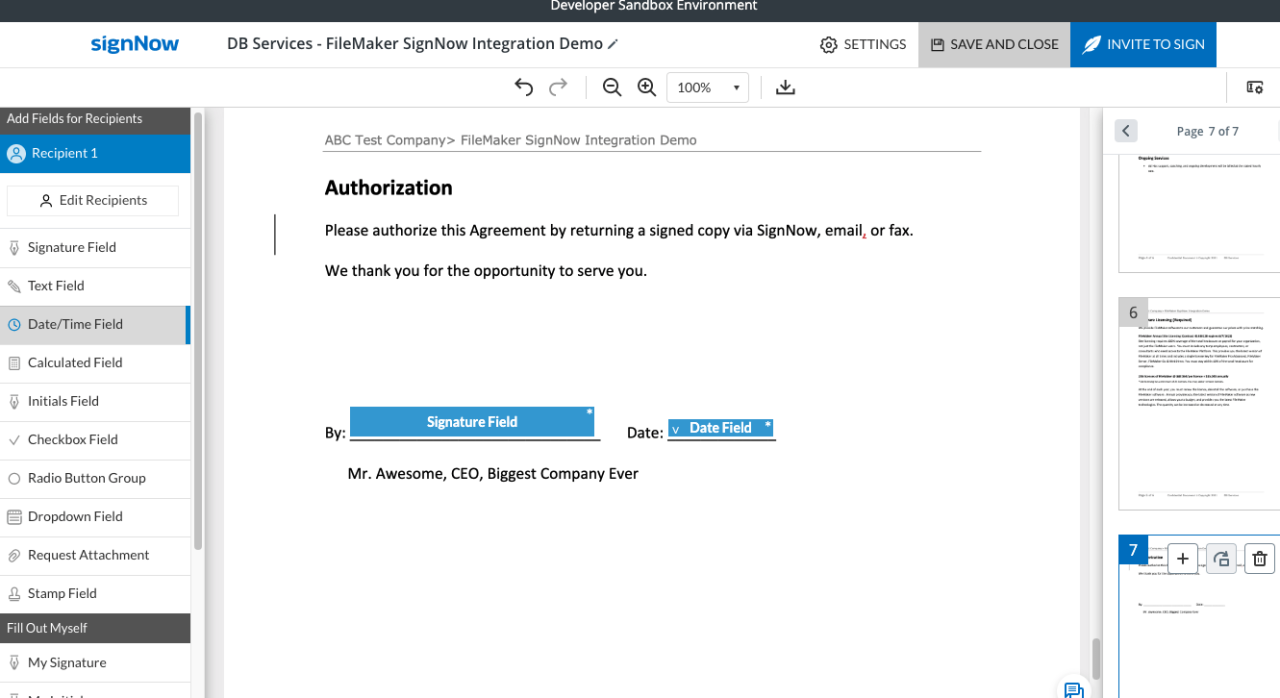
In the webpage that opened up with the template you uploaded, add all the smart fields that you need. Just a reminder that calculated field, drop-down field, and radio button group are not supported for this demo, but all the other fields will work. In this example, we have added an initials field to every page besides the last page and added a signature and date field on the last page. Once you have added all the fields you want the user to sign or enter data for, click on the save and close button in Sign Now. This completes step 3 and will allow you to save all the data before you pull it into FileMaker.
Once the template is saved, we want to perform step 4 by hitting the Create button. If there are any errors, like no smart fields added to the document, it will capture the error and tell you so at this point. Otherwise, the smart fields are generated and the template document that was uploaded to SignNow is now deleted.
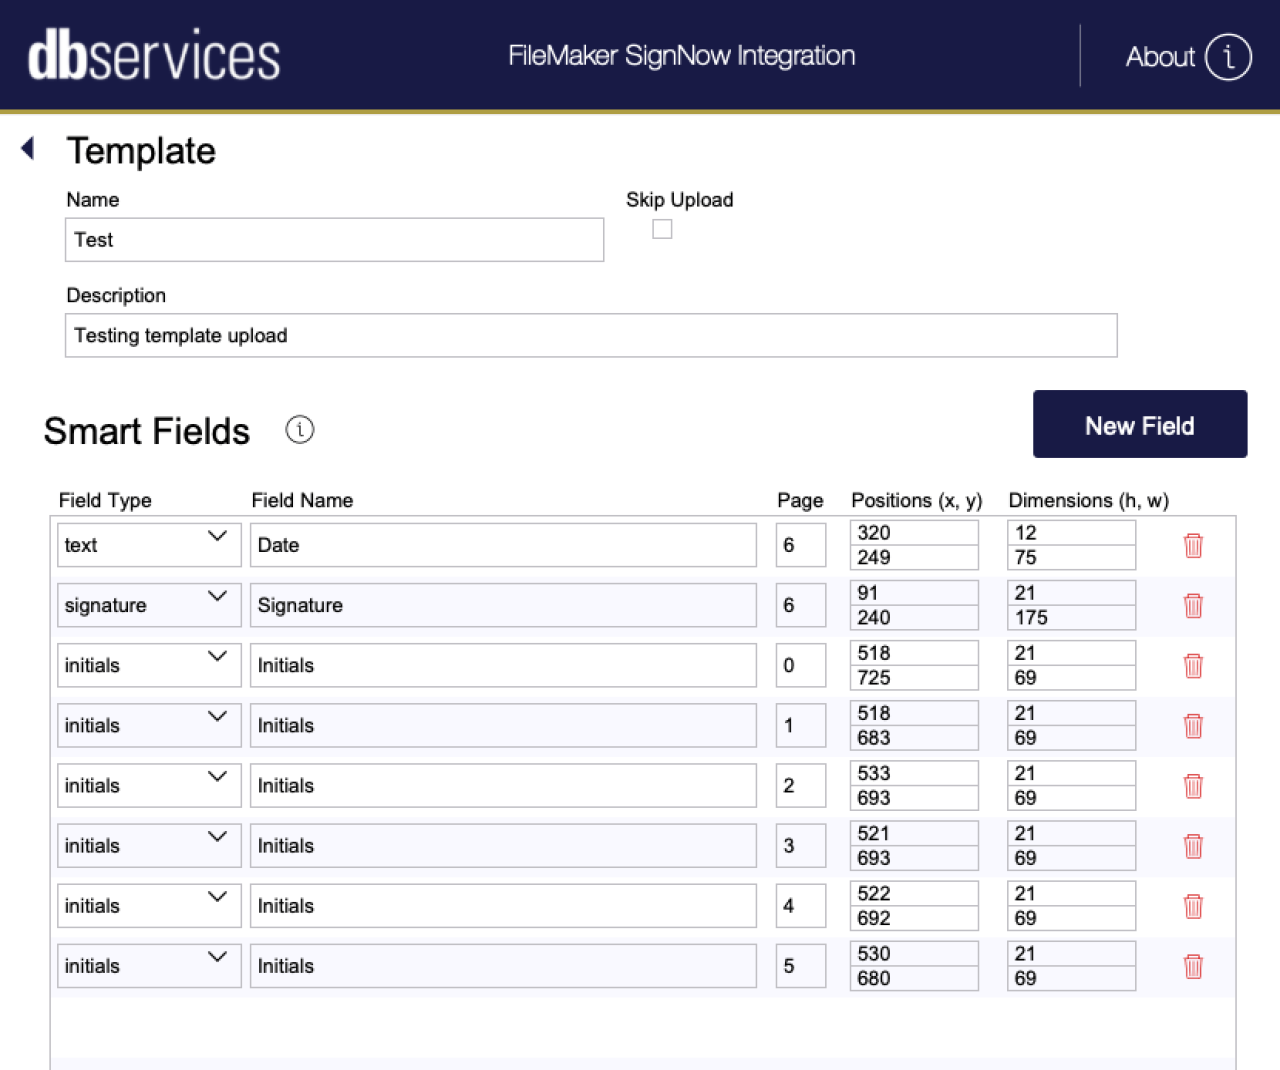
As you can see, we pulled in an initials field that was created for every page but the last page. We also created the signature and the date field for the last page. Note that the pages start with 0 because that is how SignNow recognizes the pages. So the template we uploaded had 7 pages total. We pull in 8 fields with their exact dimensions, location, and page where they are located. All this information is in FileMaker now.
The most powerful aspect of this? You can modify them! You can manually add more fields and unique ones that are not on the list like a stamp field, change the dimension, change the page where they would appear, or delete them. A warning, though; if you add a field like on page 10, but there are only 7 pages, or if you add negative dimensions, the system will error out. But as they say, with great power comes great responsibility!
Uploading Documents and Sending
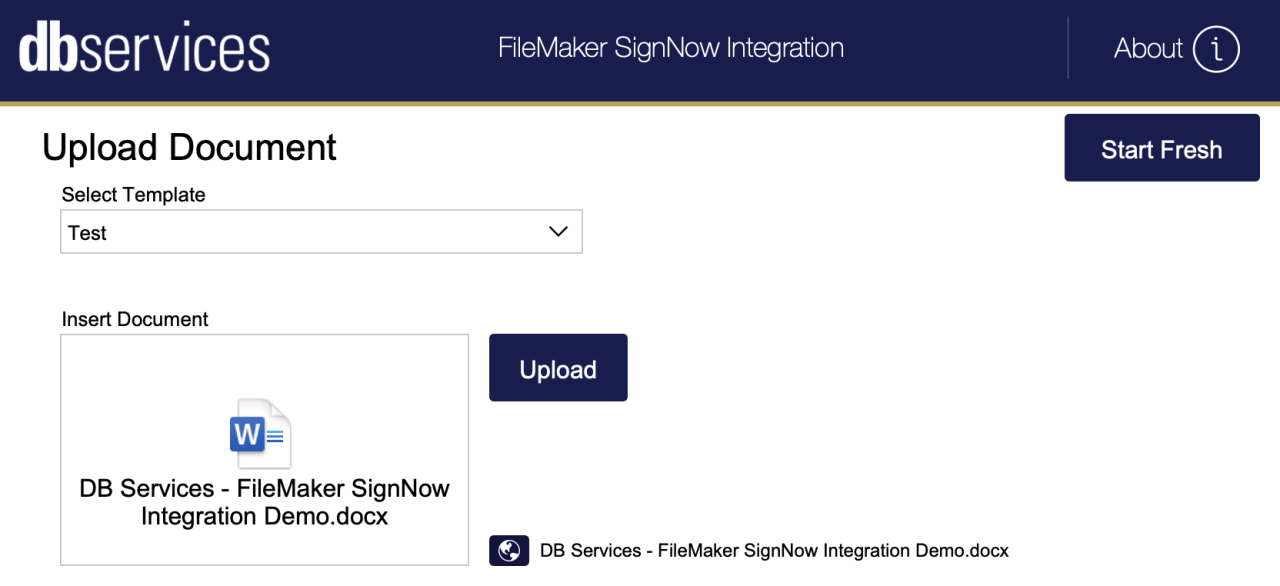
Once we have at least one template set up, we can now upload a document and send it using that particular template. Click on the next step button to go to the final upload and send document layout. To upload, select the template, insert the document to upload to SignNow, and hit upload. This will generate a link where you can see the document uploaded to SignNow. Another warning here; if you choose the wrong document template and document to upload, you will get an error. There is no way to check the document you uploaded is matching the templates, so you have to be diligent with your uploads here!
Once the document is uploaded, it is very easy to send. Just add the recipient email address (the user who would be filling out all the information in the document sent). You can also use Cc recipients to allow multiple users to just be able to view the document, but they will not be able to sign anything. In the example, I am sending the document to three different emails.
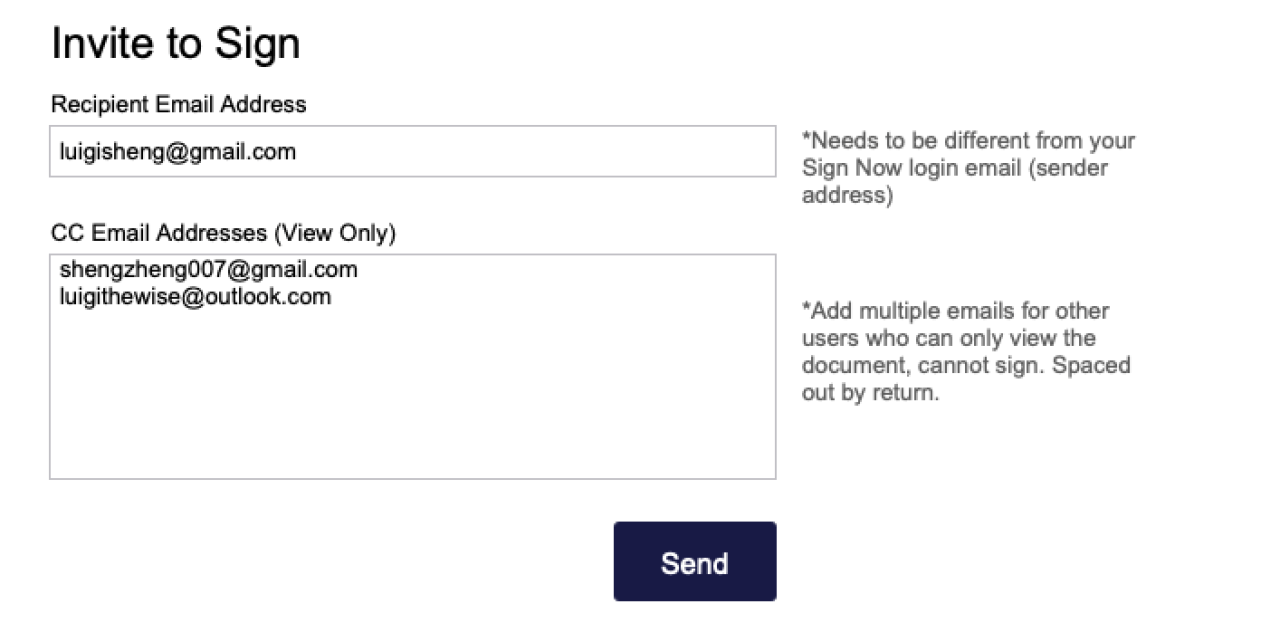
Once you hit send, if it was successful, you will get a message that says "Successfully sent document to users". To double check, you can go to SignNow and see that it is sent to three email accounts with one signer and two viewers.

Conclusion
Integrating SignNow with your FileMaker system can reduce the costs of sending documents while streamlining the process and allowing for automation. SignNow also allows you to easily create templates on the FileMaker side, giving you full control to customize your document signatures and other fields. Contact us today for assistance integrating SignNow with your FileMaker system.
Download the FileMaker SignNow Integration File
Please complete the form below to download your FREE FileMaker file.