
FileMaker 15 provides us with the ability to interact with iBeacon devices using FileMaker Go. This means with some setup we can associate data in our FileMaker solution with physical locations and have our iOS devices access them via the iBeacon technology.
1. What is iBeacon
![]()
iBeacon is a protocol developed by Apple and introduced in 2013. Much like a lighthouse which sends a signal of light to communicate with ships, an iBeacon device (more commonly referred as beacon) uses a bluetooth low energy (BLE) signal to communicate with any iOS device within its range.
While an iOS device is within the range of a beacon, it can measure its proximity to the beacon. This measurement is much more accurate than the location information you get from GPS, especially when you are indoors.
Watch on Youtube: FileMaker 15 iBeacon
2. Get your beacons and set them up
In order to interact with iBeacon using FileMaker Go 15 you need to have some beacons first.
2.1. Get beacons
![]()
Regarding hardware, there are many devices that can be used to broadcast as a beacon.
You can easily turn your computer, iPad or iPhone into a beacon with the help of apps such as "Locate".
Or you can purchase commercial beacons. They are usually priced around $10-$20 each with a battery life of 6 months - 2 years.
2.2. Beacon settings
Once you get your beacons, the next thing to do is to set them up.
The most important settings are the following three that describe the identification of a beacon:
UUID - The UUID (universally unique identifier) is the top level identification a beacon has. It is usually used to identify beacons from a specific organization. For example, beacons for all branches of a retail store could share the same UUID.
Major - Major is the second level of identification. It is usually used to identify a group of beacons. For example, all beacons in a specific branch of a retail store could share the same major.
Minor - Minor is the bottom level of identification. It is usually used to further identify specific beacon(s) within a group of beacons. For example, beacons placed on each shelf in a specific branch of a retail store can be identified by their minors.
Other settings:
Transmission frequency: May be altered using device-specific methods.
Rate & transmit power: Both have an effect on the beacon's battery life
3. Introducing RangeBeacons () Function
FileMaker 15 added a new calculation function named "RangeBeacons" which gives back a list of beacons surround you and their proximity information. This enables FileMaker Go to interact with iBeacon devices.
3.1. Format
First let's take a look at the format the function:
RangeBeacons (UUID {; timeout; major; minor})
3.2. Parameters
It has four parameters:
UUID - The UUID of beacons you are looking for. This parameter is required by the function.
timeout - The number of seconds to wait before returning a value. If timeout is not specified, the function returns a value after five seconds.
major - The major value of beacons you are looking for. Major is an optional parameter. If both major and minor are not specified, this function will look for all beacons with the specified UUID.
minor - The minor value of beacons you are looking for. Minor is also an optional parameter. If minor is not specified, this function will look for all beacons with the specified UUID and major.
The values of UUID, major and minor are determined by your beacons hardware settings and your use case, which is pretty straightforward.
However to set a proper value for timeout is a little bit tricky. If timeout is set too high, you will have to wait for a long time before receiving any information. If it is too low, you may miss some or even all beacons around you, depends on your beacons geological setup.
So if you are about to build a solution using this function, I would strongly recommend testing your solution in the actual working environment to determine a proper value for timeout. Personally I recommend starting with 2 seconds and then go up if necessary.
3.3. Data returned
The RangeBeacons function will return a list of beacons and their proximity to your iOS device. Each row returned is a beacon found. Within each row, you will find the following information (from left to right) separated by a comma:
UUID - the UUID of the beacon you found.
Major - the major value of the beacon you found.
Minor - the minor value of the beacon you found.
Proximity - a number indicating the relative proximity to the beacon. 1 means the beacon is very close (within a couple of inches), 2 means the beacon is relatively close (within a couple of feet), 3 means the beacon is far (more than 30 feet away), 0 means the proximity of the beacon could not be determined.
Accuracy - the accuracy of the proximity value, measured in meters from the beacon. You can use accuracy to further distinguish beacons with the same proximity value.
RSSI - the received signal strength of the beacon, measured in decibels (db).
3.4. Example
RangeBeacons("D9B9EC1F-3925-43D0-80A9-1E39D4CEA95C") returns information about all nearby iBeacons with the specified UUID. As shown below:
D9B9EC1F-3925-43D0-80A9-1E39D4CEA95C, 5, 1, 3, 14.68, -79
D9B9EC1F-3925-43D0-80A9-1E39D4CEA95C, 5, 2, 3, 18.96, -81
This result indicates that it found two beacons with the specified UUID. Let's look at the first beacon it found:
UUID: D9B9EC1F-3925-43D0-80A9-1E39D4CEA95C
major: 5
minor: 1
proximity: 3. It means this beacon is far away.
accuracy: 14.68. It means this beacon is about 14.68 meters away (around 48 feet).
rssi: -79.
4. Interacting with iBeacon using FileMaker Go 15
Now that you are familiar with the RangeBeacons function let's dive deeper and see how it can be utilized in a FileMaker solution. To demo that I'm going to walk you through how to build a simple museum tour app using FileMaker.
The purpose of this app is to provide tourists with materials that can help them better understand a piece of art when they are standing next to it.
![]()
4.1. Set up a BEACON table
As mentioned at the beginning of this article, FileMaker 15 allows us to associate data with physical locations. In this specific example, we want to associate text, image, audio or even video to the location where the artwork is at. To do that we need to set up a table to store beacon identification info as well as materials that each beacon is associated with, as shown below:![]() According to their purposes, fields in this table fall into these three categories:
According to their purposes, fields in this table fall into these three categories:
House keeping: __kptID, creationName, creationTStamp, modName, modTStamp.
Beacon identification: uuid, major, minor.
Information associated with the artwork: artworkName, associatedText, associatedPicture, associatedAudio and associatedVideo.
4.2. Create records representing iBeacon devices
Once we have the table ready, the next step is to populate this table with records. The number of records to have in the BEACON table should be the same as the number of beacons your solution may interact with.
In my example file I created two records. Their information is shown below:

4.3. Write a script to show users proper materials according to their locations.
To provide users with the data associated with their location, we need to write a script that does the following steps:
Ranging for all beacons around the user with the UUID used by the museum.
Go through all beacons returned and find out which beacon is the closest to the user.
Take user to the beacon record of the closest beacon and show them associated materials.
Once we get the script written, we can attach it to a button so whenever the user wants to get the info of the artwork that's in front of them, they can press that button to run this script.
4.4. Set up beacons
Enough with the software, now let's set up our beacons.
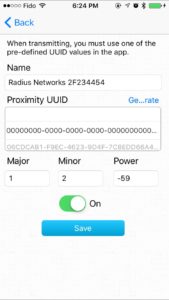
When I was testing the sample file I used the Locate app to turn two of my iOS devices into beacons. Here are their settings in Locate:

You can definitely use other iBeacon devices to play with the sample file, as long as their UUID, major and minor settings match the data in the BEACON table.
4.5. Place beacons
The last step is to place beacons to proper locations. If this is for a museum, beacons will need to be placed next to their corresponding pieces of art.
4.6. Try out the sample file
Please open the sample file on your computer and follow the instructions listed in there. I also briefly demo'ed how to set up the environment to use the app in the video for this article.
5. Other use cases
Besides the tourism use case mentioned above, there are many other use cases that can benefit from using iBeacon. I am going to list a few of them here. This list is definitely not exhaustive.
5.1. Inventory Management
Many people use FileMaker to manage inventory. They like to store items' location info in it so they know where each item is at in the warehouse. Now with iBeacon, you can take it to the next level:
If you are doing an inventory check, your system can pull up information of all items on a shelf or even on a certain row of a shelf for you.
If you need to move an item from one location to another, to record its new location you can simply press a button. Let's face it, if you need to carry things or wear gloves inside a warehouse, typing sucks.
Safety instructions (or other instructions) can be associated with locations where they are needed. User will have them at their finger tip and the instructions can take the form of text, image, audio or video.
5.2. Event Organization
iBeacon can play a very important role in indoor navigation because it can show you where you are. I think everyone who attended last year's FileMaker DevCon would have loved that feature in the DevCon App. (Please do it this year FileMaker!)
iBeacon can be used to display location-specific event info. Event organizers can use it to explain what's going on here and provide information about vendors or artists info (depends on what kind of event you are doing) to the attendees.
You can even use it to add some fun to your event by adding treasure-hunt-like features to your event app.
5.3. Education Industry
Use the beacons as digital bulletin boards for courses or buildings for students.
Teachers can broadcast information about their classes or exams.
Conclusion
The ability to interact with iBeacons really opens up infinite possibilities of what FileMaker can do. It allows your FileMaker solution to be the link between the virtual world and the physical world. With a little bit of imagination, I believe you will be able to find a way to use iBeacon to help you manage or grow your business. If you need assistance setting up iBeacons with your FileMaker application, contact our team at DB Services.
Have an amazing idea of how to take advantage of iBeacon but don't know how to implement it?
Let us help.
Download the FileMaker iBeacons File
Please complete the form below to download your FREE FileMaker file.