

Xero is a comprehensive accounting system for small to medium-sized companies with over a million subscribers. It can handle any accounting task ranging from inventory to bank transactions and it was specially designed to be a cloud-based solution to save clients from IT headaches. And with its simple API, you can integrate it with your FileMaker application to streamline workflow and eliminate double data entry.
This article will show you how to integrate FileMaker with Xero, including how to create a Xero developer account and application, establish a connection to the API, make a request, and parse the response.
Setting Up A Free Xero Development Account
The first step to complete is to create a Xero free developer account. I recommend enabling the Xero demo company after the account setup is complete to use for testing purposes. The demo company is easy to set up and you can reset the data whenever you need to. Simply navigate to the My Xero page and click the Try the Demo Company button. Be sure to set the company time zone that matches your location.
Now you need to choose the type of application for Xero. You can connect to Xero as one of three entities:
Private Application: allows long term access and bypasses user authorization process. Xero unfortunately uses RSA-SHA1 method to generate public and private keys that can be only generated using third party plugin for now. I suggest establishing connection between Xero and FileMaker as a public application.
Public Application: allows 30 minutes connection to Xero using a verifier code. The sample file attached to this article will walk you through this process.
Partner Application: allows long term connection through public application to be used by others. Your organization must be approved by Xero to build this type of application.
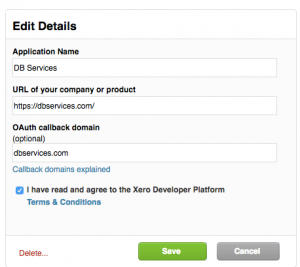
Add your public application following our example below. The company URL needs to start with "http". The OAuth callback domain can be left empty. To get started, download the demo file shown on this article and follow the step-by-step process.
Establishing A Connection With Xero
Once you have set up a public application, you’re ready to establish a connection to the accounting API. You can now set http headers with FileMaker 16, but there is no native way to easily parse XML, which is Xero’s default data format. I suggest using the BaseElements plugin as it is a free and powerful tool to parse XML.
To authenticate your solution, please reference the documentation on OAuth1.0. The main goal of OAuth1.0 is to make sure the signature string matches what the API expects. The signature string is an encrypted combination of all parameters passed in the request in alphabetical order. The authentication process can be quite tricky, so I highly recommend taking a look under the hood of the example file we have provided. Here's sample code to request access to your Xero account:
Insert from URL [ Select ; With dialog: Off ; $result ; $url ; cURL options: "-X GET" & " -D $httpResponseHeaders" & " -H content-type:application/x-www-form-urlencoded" ]
You can easily establish a connection with your consumer key and secret code. But you will have to renew your access code every 30 minutes. Also keep in mind that the URL and request body differ depending on what you are trying to do. Take a look at the Xero documentation to make specific calls to Xero.
Making Requests and Parsing the Response
Each Xero module has a different URL to call. My example shows you how to create and update each customer, and populate a Xero ID field from the response we get. I highly recommend fine tuning your requests and gaining a better understanding of Xero’s response by using their Xero Previewer application.
In the example file provided, you can create and update a Xero contact using a POST request with customer details shown on the customer details screen. Customer data is wrapped in XML formatting using custom functions and then passed as the parameter in the Insert from URL script step.
Once a successful request has been made, a response in XML will returned. You will then be able to use the function BE_XPath ( xml ; xpath {; namespaceList ; asText } ) to pull any information out of the response that you wish.
<Response xmlns:xsd="http://www.w3.org/2001/XMLSchema" xmlns:xsi="http://www.w3.org/2001/XMLSchema-instance">
  <Id>ffd5095f-a4d7-4428-b46b-4b06e21d48e2</Id>
  <Status>OK</Status>
  <ProviderName>DB Services</ProviderName>
  <DateTimeUTC>2017-07-31T12:01:34.4110112Z</DateTimeUTC>
  <Contacts>
    <Contact>
      <ContactID>4623e1cb-391a-44d3-9c3b-7e8af035745f</ContactID>
      <ContactStatus>ACTIVE</ContactStatus>
      <Name>DB Services</Name>
      <FirstName>Gayoung</FirstName>
      <LastName>Moon</LastName>
      <EmailAddress>sales@dbservices.com</EmailAddress>
      <Addresses>
        <Address>
          <AddressType>STREET</AddressType>
          <AddressLine1>8604 Allisonville Road</AddressLine1>
          <AddressLine2>Suite 231</AddressLine2>
          <City>Indianapolis</City>
          <Region>IN</Region>
          <PostalCode>46250</PostalCode>
          <Country>USA</Country>
        </Address>
        <Address>
          <AddressType>POBOX</AddressType>
        </Address>
      </Addresses>
      <Phones>
        <Phone>
          <PhoneType>DEFAULT</PhoneType>
        </Phone>
        <Phone>
          <PhoneType>DDI</PhoneType>
        </Phone>
        <Phone>
          <PhoneType>FAX</PhoneType>
        </Phone>
        <Phone>
          <PhoneType>MOBILE</PhoneType>
        </Phone>
      </Phones>
      <UpdatedDateUTC>2017-07-31T05:19:47.387</UpdatedDateUTC>
      <IsSupplier>false</IsSupplier>
      <IsCustomer>false</IsCustomer>
    </Contact>
</Contacts>
</Response>
For example, you can get the newly created Xero contact ID by using the following set of function:
BE_XPath ( $postResponse ; "/Response/Contacts/Contact[1]/ContactID" )
Xero: Things to Keep In Mind
It's important to know limits of Xero API when building integration between FileMaker and Xero. The Xero API continues to improve itself and introduce new functionalities, but for now, here are couple of important items that you need to know:
The Xero API is limited to 60 calls in a rolling 60 second window.
It also has maximum of 5,000 calls in a 24 hour window.
POST to Accounting or Payroll has a size limit of 3.5 MB and a file size limit of 10 MB. This is why Xero suggests developers post bundles of up to 50 elements in one call.
All timestamps must be in standard time (aka ignore Daylight Savings).
Xero is designed to work with small and medium-sized business the best. Large requests will make both reporting and communication between applications slower.
Xero API expects timestamps to be posted in UTC. Our demo file handles this for you as long as correct time zone and daylight savings checkbox is marked according to your computer's timezone.
Conclusion
Xero is a powerful cloud application for small to medium-sized companies that can be easily integrated with your FileMaker application. Integrating your application with Xero will dramatically streamline your accounting workflow, eliminate double data entry, and reduce IT headaches by going to the cloud. If you need help integrating Xero with your FileMaker application, contact us at DB Services.
Did you know we are an authorized reseller for Claris FileMaker Licensing?
Contact us to discuss upgrading your Claris FileMaker software.
Download the FileMaker Xero Integration File
Please complete the form below to download your FREE FileMaker file.