
That invoice sitting in your inbox doesn't need a person to type it in. Azure Document Intelligence pulls the data out automatically, structures it, and hands it straight to FileMaker, no manual entry required.
Add it to your workflow, and you cut data entry errors, save staff hours, and give your team usable data at scale instead of a stack of documents someone still has to key in by hand.
Azure Document Intelligence is a cloud-based AI service built to extract data from both structured and unstructured documents. Because it runs on a single-use model rather than a general-purpose LLM, requests are processed quickly and cost a fraction of what the same job would cost when run through a large language model. That's what makes it practical to run at real scale inside FileMaker, not just as a proof of concept. Let's take a look at how it works and how to put it into practice in FileMaker.
Azure's Prebuilt Models
Azure Document Intelligence comes with a library of prebuilt models, each trained on a specific document type and already tuned to the fields that appear in it. This article will focus on the invoice model and how to pull its data into FileMaker. Alongside the invoice model, there are prebuilt models for receipts, business cards, ID documents like passports and driver's licenses, contracts, and tax forms such as W-2s and 1099s. Here's how to set up your very own integration, from creating your Azure resource to sending your first request from FileMaker.
Before You Begin
Before integrating Azure Document Intelligence into your FileMaker application, consider cost. Azure bills by the number of pages processed, with no flat monthly subscription fee, so you only pay for what you use. It's even free to get started. By using the F0 service tier, you get access to the power of Azure Document Intelligence for 500 pages a month at no cost. This allows you to run proof-of-concept tests within your daily workflows to determine whether Azure Document Intelligence is a good fit for your needs. Make sure to check out the Azure Document Intelligence service tiers before building anything that exceeds the F0 tier's limits.
Create An Azure Resource
You'll need to have an active Azure subscription to access Document Intelligence. Use the free subscription to get started.
Once you have an Azure subscription, you're ready to create your Document Intelligence resource. Sign in to the Azure portal and follow Microsoft's guidelines to get set up.
Lastly, you'll need to grab your new endpoint and key for your Azure resource, as you'll need them later in your FileMaker scripts. These values should not be shared with others.
Configure a Submit Invoice Script
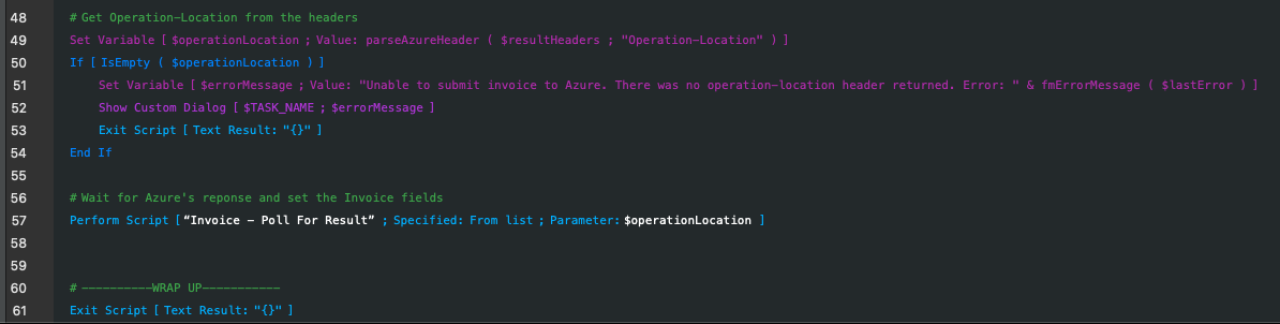
The first script needed is the one that sends the request to Azure. The request body is JSON containing either a public URL to the document or a base64-encoded copy of the file. Since the document will live inside a FileMaker container field, base64Source is the practical choice. That JSON is POSTed to Azure's analyze endpoint, which is built from three components: your resource's endpoint, the model you're using, and the API version. The call is asynchronous, meaning Azure responds immediately with 202 Accepted and an Operation-Location header pointing to a results URL. A separate script is used to poll the results URL.
FileMaker's Insert from URL script step supports the cURL options needed to send the request to Azure: --request to set the HTTP method, --header to add the subscription key and content-type headers, --data to send the JSON body (base64 encoded document), and -D $responseHeaders to capture the Operation-Location response header. After the request goes out and Azure sends back a response, there are two things to check before polling the results URL:
Ensure there were no cURL-level failures. It is important to note that a successful 202 Accepted response from Azure returns an empty body; everything useful lives in the headers. Since FileMaker treats the empty body as an error 10, "Requested data is missing," the script treats error 10 the same as no error at all.
Ensure the HTTP status code reads 202. Anything other than 202, an invalid API key, a malformed request body, or a typo in the model name means Azure rejected it even though cURL itself reported no error.
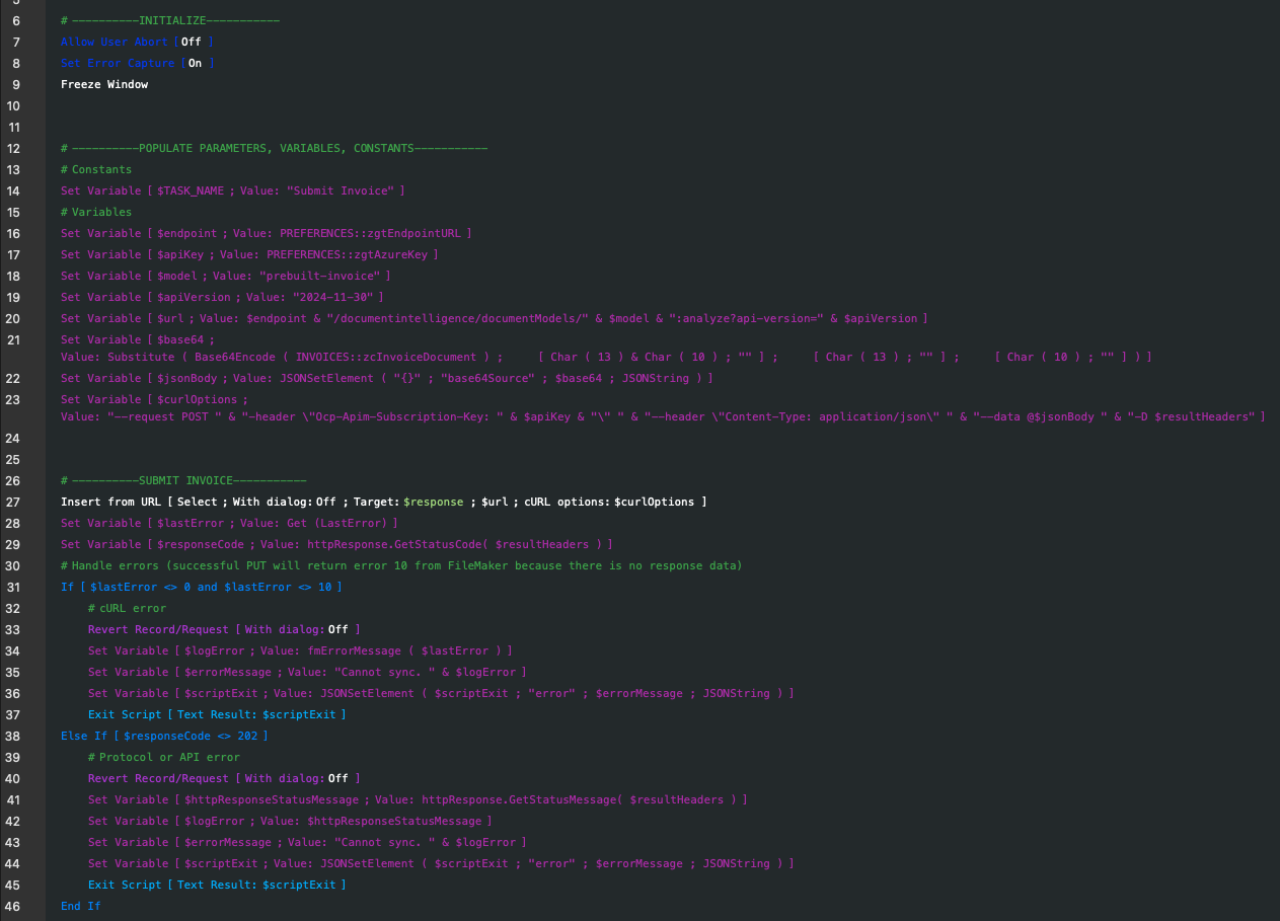
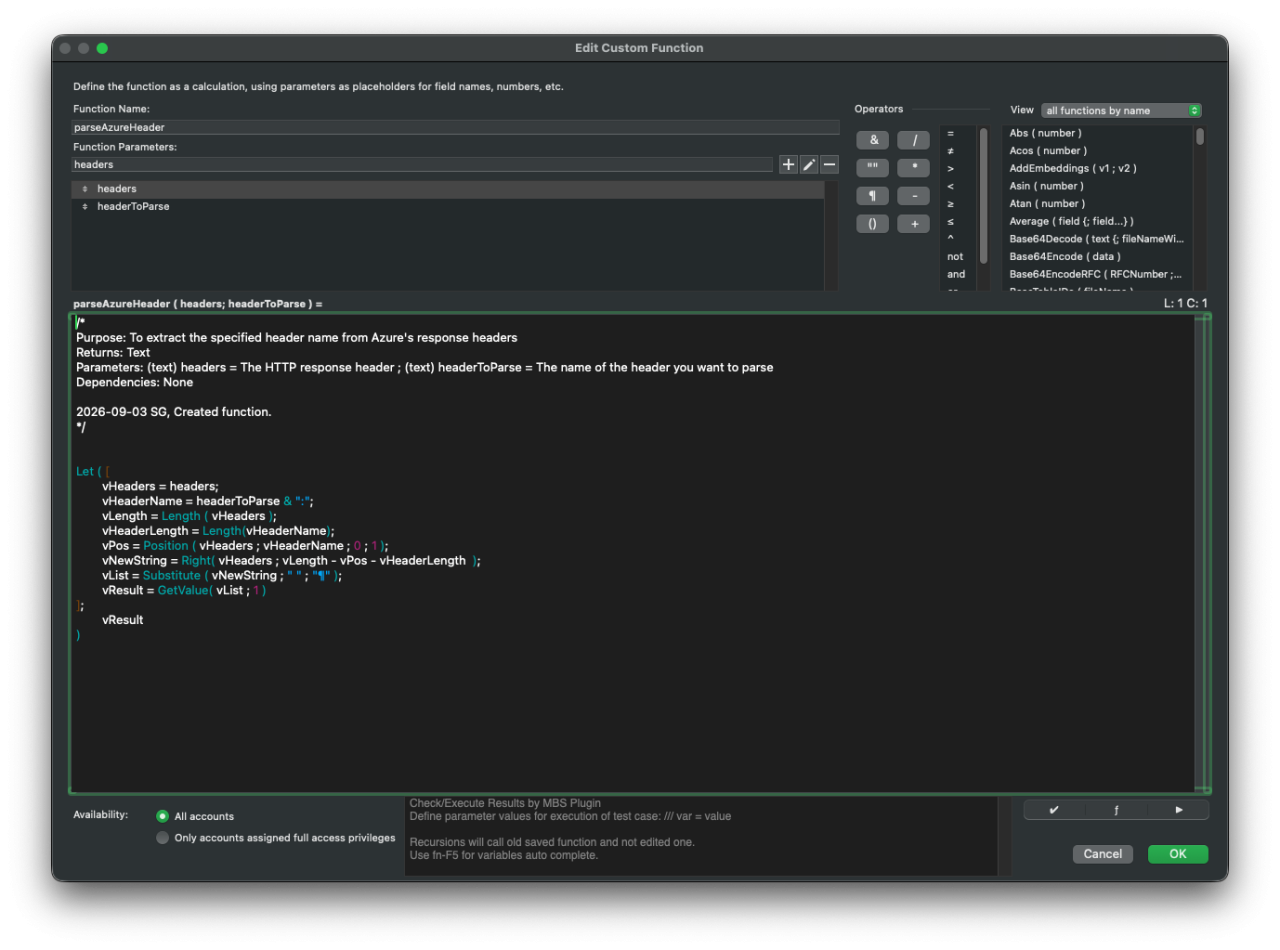
The desired header "Operation-Location" is extracted from Azure's response using the custom function parseAzureHeader(). The function locates where the requested header starts, then grabs everything after it in the header block and formats the string to isolate the header's actual value. That's what turns a wall of response headers into the single URL the polling script actually needs.
Building a Polling Script
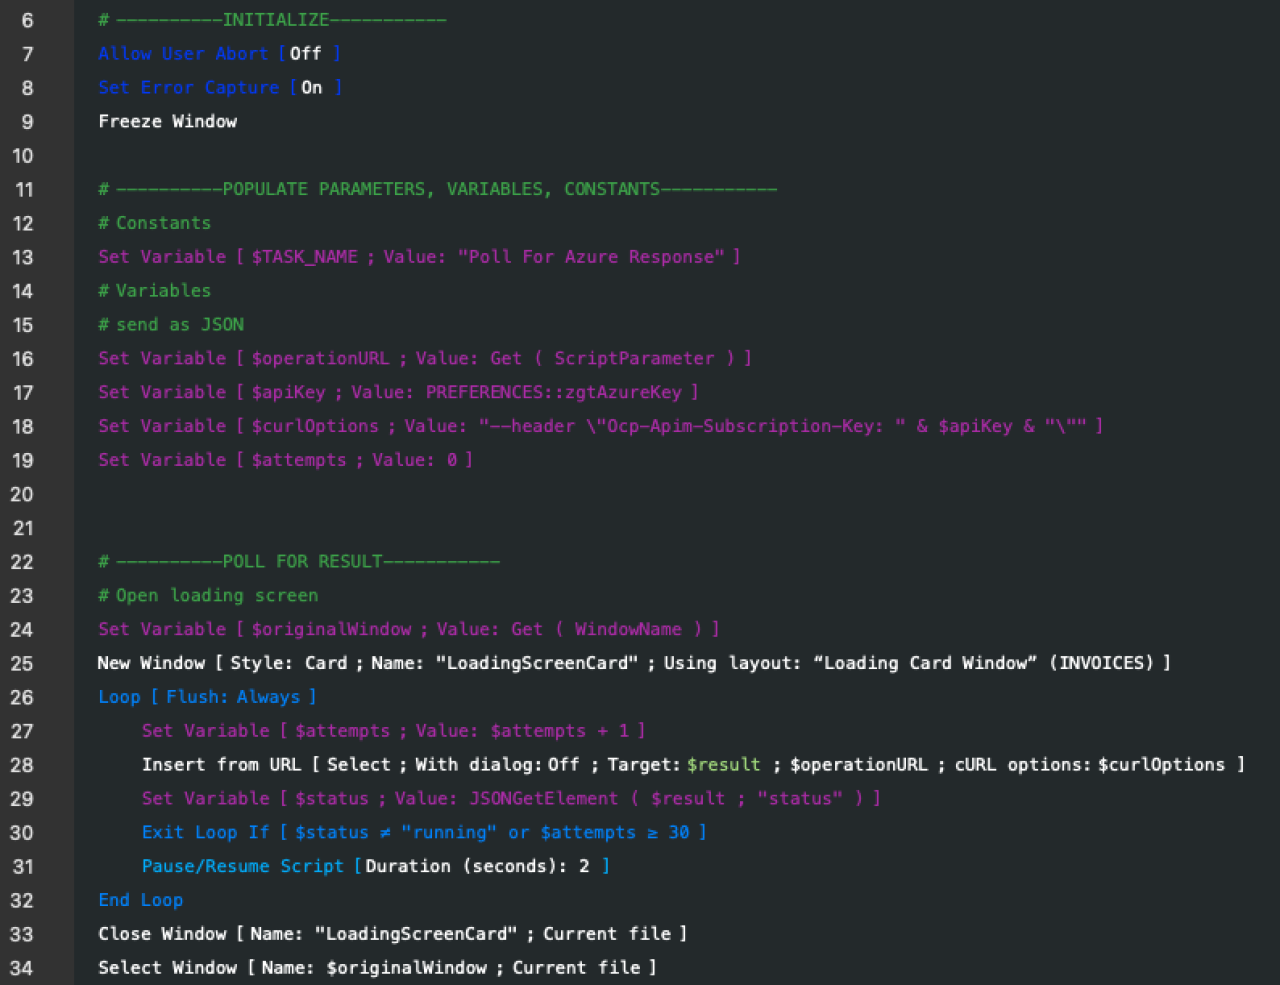
The second script polls Azure's result by sending requests to the Operation-Location URL, using an API key from your Azure resource. A loop will continue to poll the Operation-Location URL until the status field returns "running". The loop is capped at 30 attempts and 60 seconds total, so a stuck or unusually slow Azure job doesn't leave the script running indefinitely.
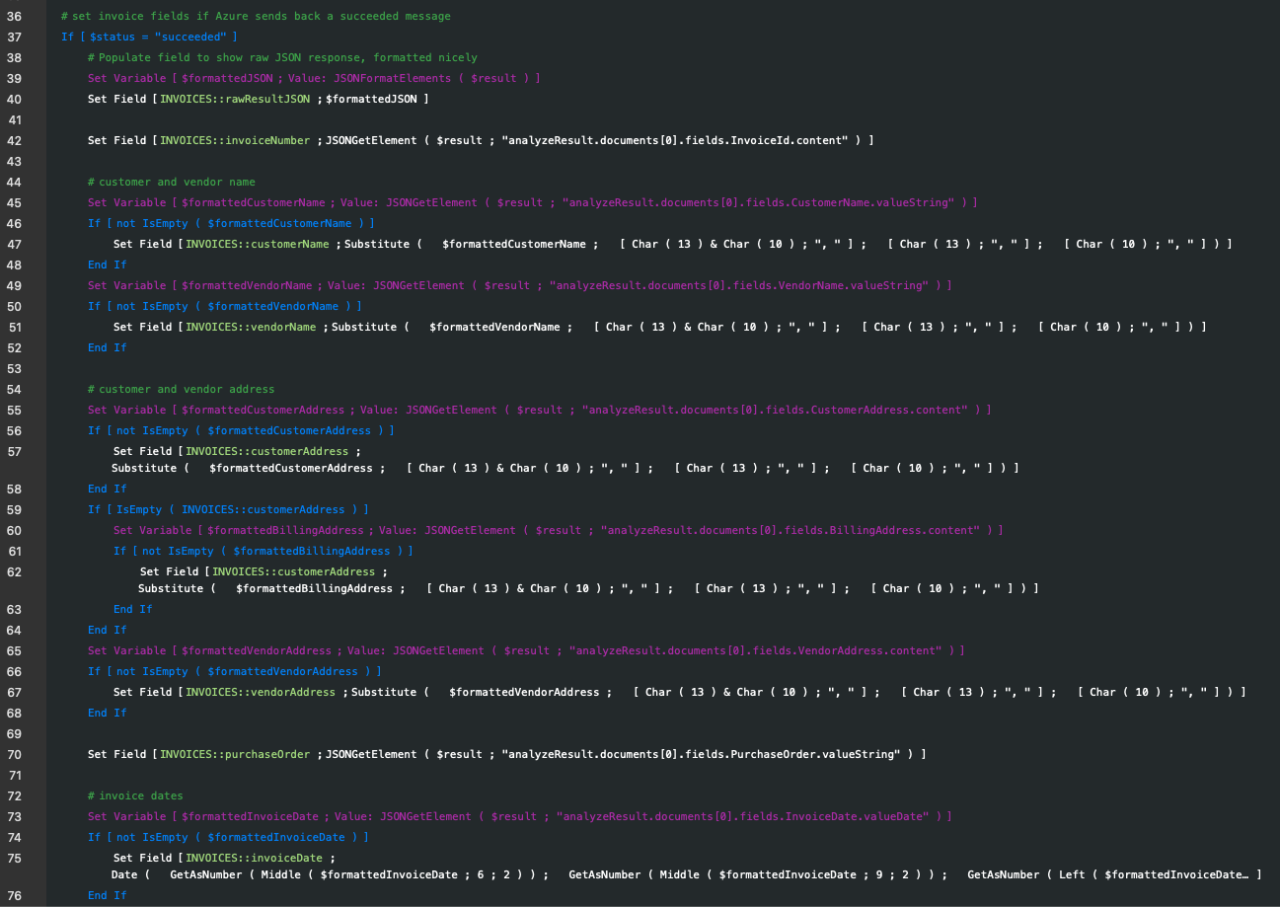
Once Azure's response status reads "succeeded", the result JSON is used to populate FileMaker fields and is stored for reference. Cleanup techniques such as stripping line breaks from multi-line name and address fields and converting Azure's ISO-formatted dates into real FileMaker date values are used to format the response data to match FileMaker's native field types. From here, the heavy lifting is done. You now have real invoice data sitting in your Invoices table, ready to drive whatever comes next: reporting, approval workflows, matching against purchase orders, exporting to accounting software, or just giving your team a searchable record.
Other Custom Functions
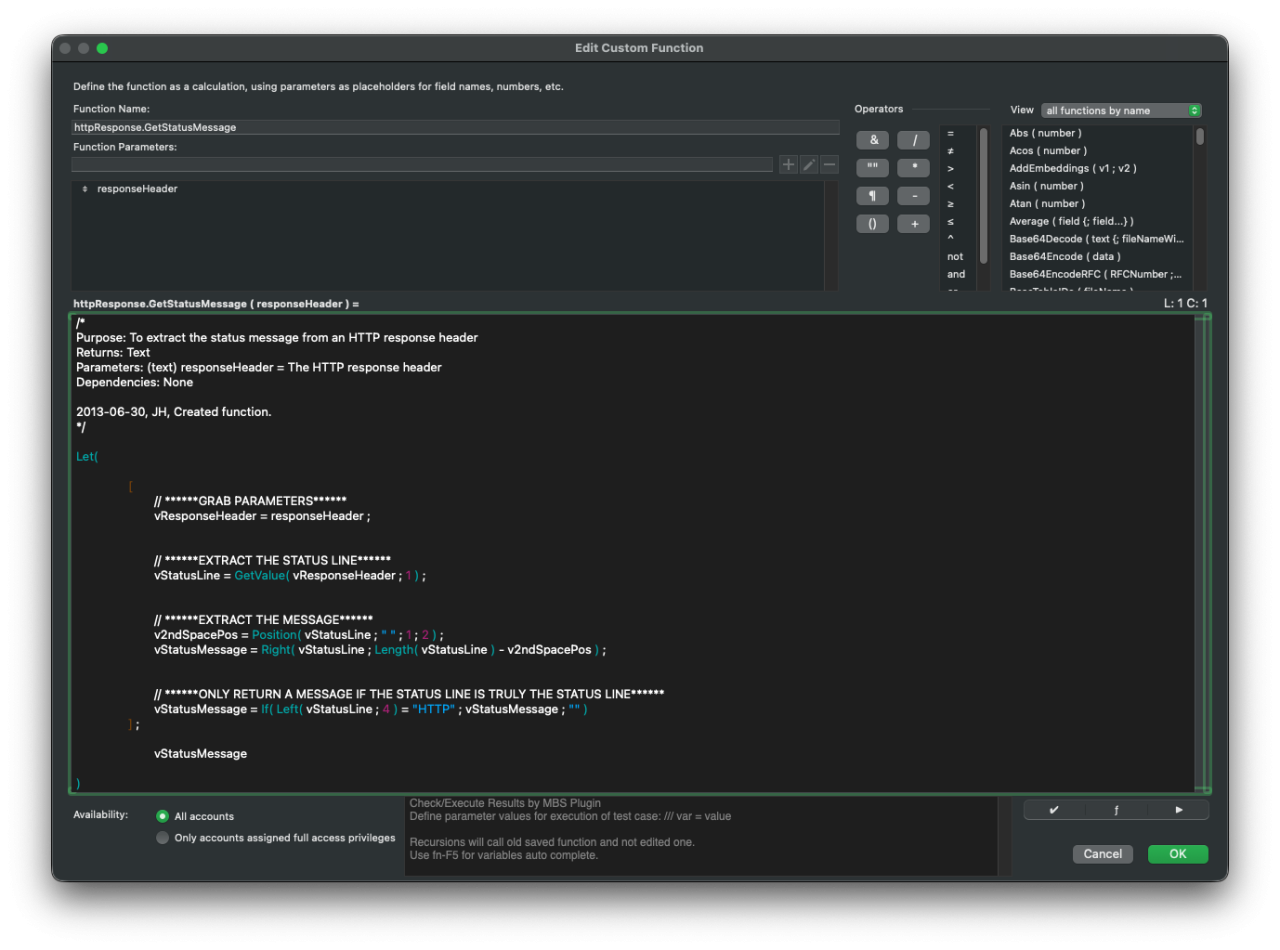
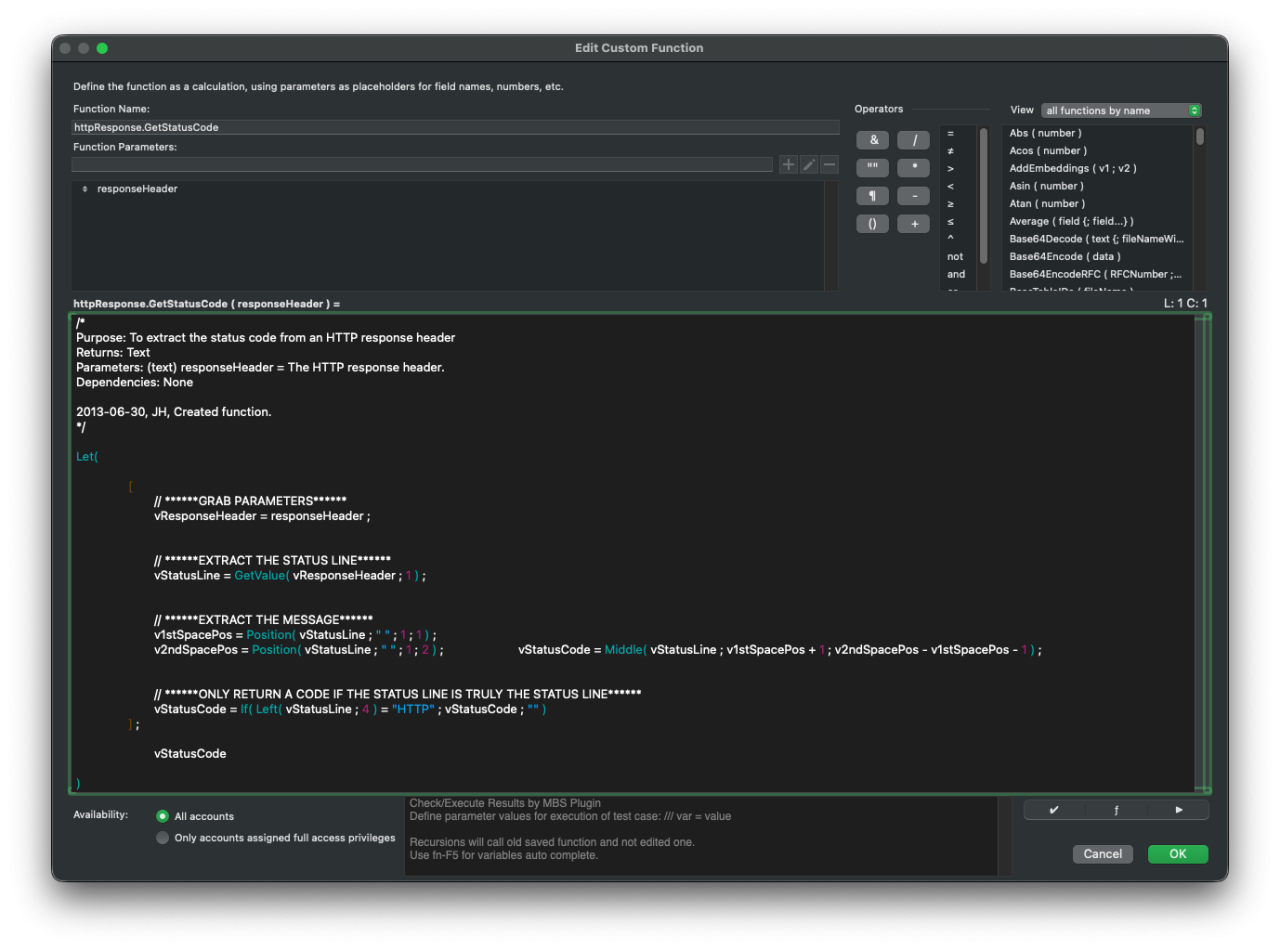
In addition to pulling the Operation-Location header from the response, the script needs to confirm that Azure actually accepted the request. Two small custom functions handle that: one extracts the numeric status code from the response headers, and the other extracts the accompanying status message.
httpResponse.GetStatusCode() formats the Azure response status line to check whether the returned code is the desired 202.
httpResponse.GetStatusMessage() formats the status line string in the Azure response to store the returned message, which will be shown to the user if it is not the desired "Accepted".
The Bottom Line
Connecting Azure Document Intelligence to FileMaker turns document processing from a manual task into something your database handles on its own. Once it's wired in, incoming invoices become structured, ready-to-use records without anyone having to touch a keyboard, freeing your team up for the work that actually needs a person.
Azure is one of many platforms FileMaker can connect to. Explore our FileMaker integrations to see what else your system can automate.
If you're ready to put this to work in your own FileMaker solution, reach out to DB Services. We'll help you build an integration that fits how your team works!
Did you know we are an authorized reseller for Claris FileMaker Licensing?
Contact us to discuss upgrading your Claris FileMaker software.
Download the Azure Document Intelligence File
Please complete the form below to download your FREE FileMaker file.