
Accepting payments should work for your business, not against it. The Automated Clearing House (ACH) network gives you a faster path to doing exactly that: lower transaction fees, stronger security, and a cleaner payment experience that your customers will actually appreciate. Whether you're running recurring billing, high-volume transactions, or B2B payments, ACH is a practical upgrade that pays for itself.
This article breaks down the tradeoffs of ACH, then walks through exactly how to integrate it using Stripe's API, from setting up your payment intent to mounting the element and confirming the transaction.
Considerations for ACH
As stated, there are some significant benefits to using ACH payment processing over credit cards, the solution isn’t perfect and has some drawbacks. In this section, we will explore both.
Pros of using ACH
Reduced costs for businesses: ACH transactions typically incur lower fees than other payment methods. This allows for a more cost-effective solution for regular transactions and bulk transactions.
Security: With a centralized ACH network, transactions are less prone to fraud or unauthorized use.
Large-scale batch processing: ACH can handle large volumes of transactions in batches, reducing costs.
Cons of using ACH
Slower processing times: ACH transactions typically take 1-3 business days to process. While there are usually options for faster ACH transactions, these come with additional fees.
Limited real-time authorization: ACH transactions are not authorized in real time, especially when funds are guaranteed. This could lead to more rejected payments and failed transfers.
Stripe Setup
Stripe provides an article with more information on accepting ACH payments.
The core steps are as follows:
Open a business bank account.
Update your payment flow to allow for ACH payments. In Stripe, you can find this in Settings > Payments > Payment Methods.
Present a mandate, a document gaining consent from your customers to initiate an ACH payment from their bank.
Stripe Element
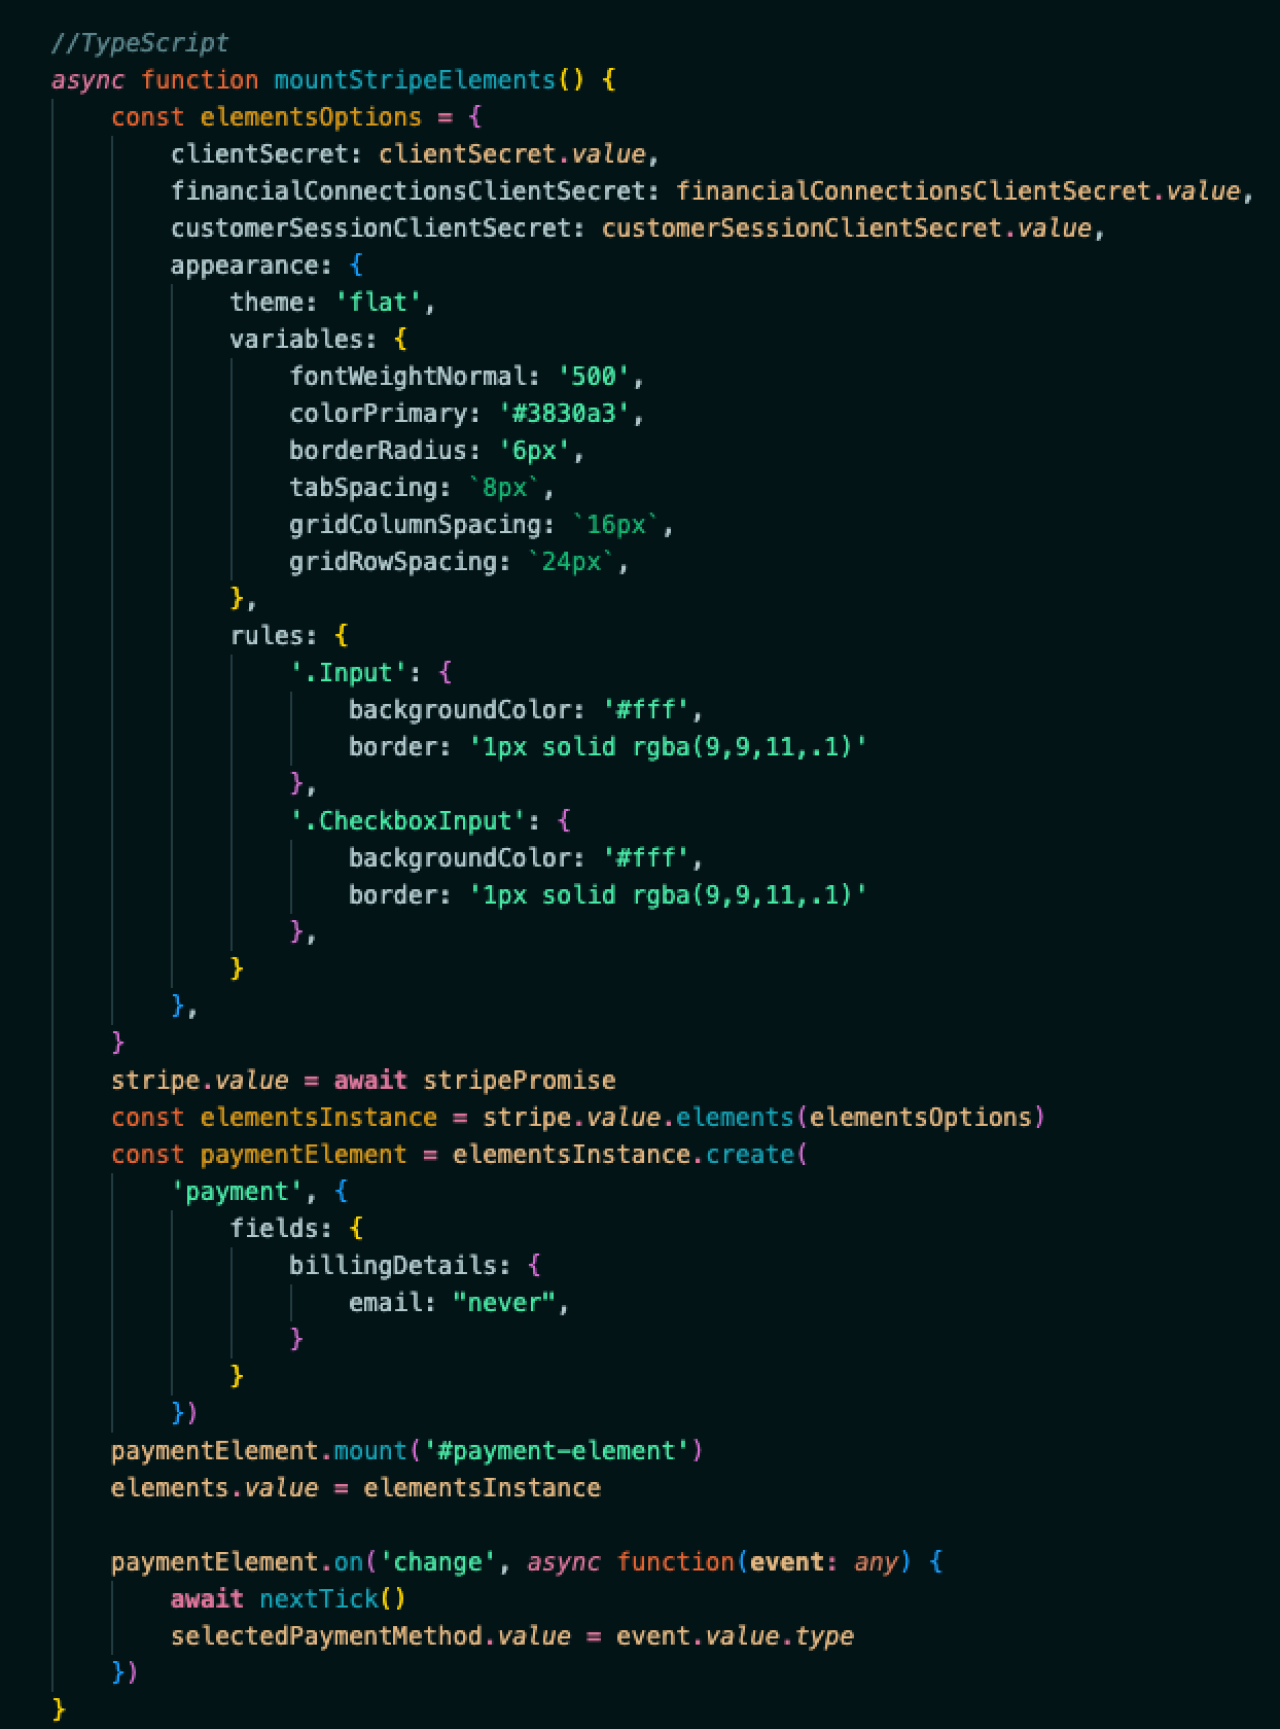
The Stripe element can be initialized to support several payment options. Each one will require a specific set of data.
Payment intent: A payment intent must be established before initializing the Stripe Element. Payment Intents acts as a guide to the process of collecting payment information. Using Stripe’s API, payment intents can be created to specify the amount, currency, Stripe customer, and other settings. Within the payment intent, you will want to set the following at a minimum:
Amount - The amount to be collected, in cents.
Currency - A three-letter ISO currency code. Stripe only accepts specific currencies. Refer to the Supported Currencies overview for more information.
Customer - This is the Stripe customer UUID you are charging for this intent.
payment_method_types - An array of the allowed payment methods for this intent. For ACH in the US, the “us_bank_account” option is required.
payment_method_options - The configuration of each payment method type.
Financial Connections Sessions: A Financial Connections Session is used as a secure way to programmatically launch the client-side Stripe.js modal that lets your users link their accounts. Creating a session secret to enable account linking.
Customer Session Client Secret: A short-lived key that allows your front-end to securely interact with the customer-specific resource in Stripe.
Mounting Stripe Element
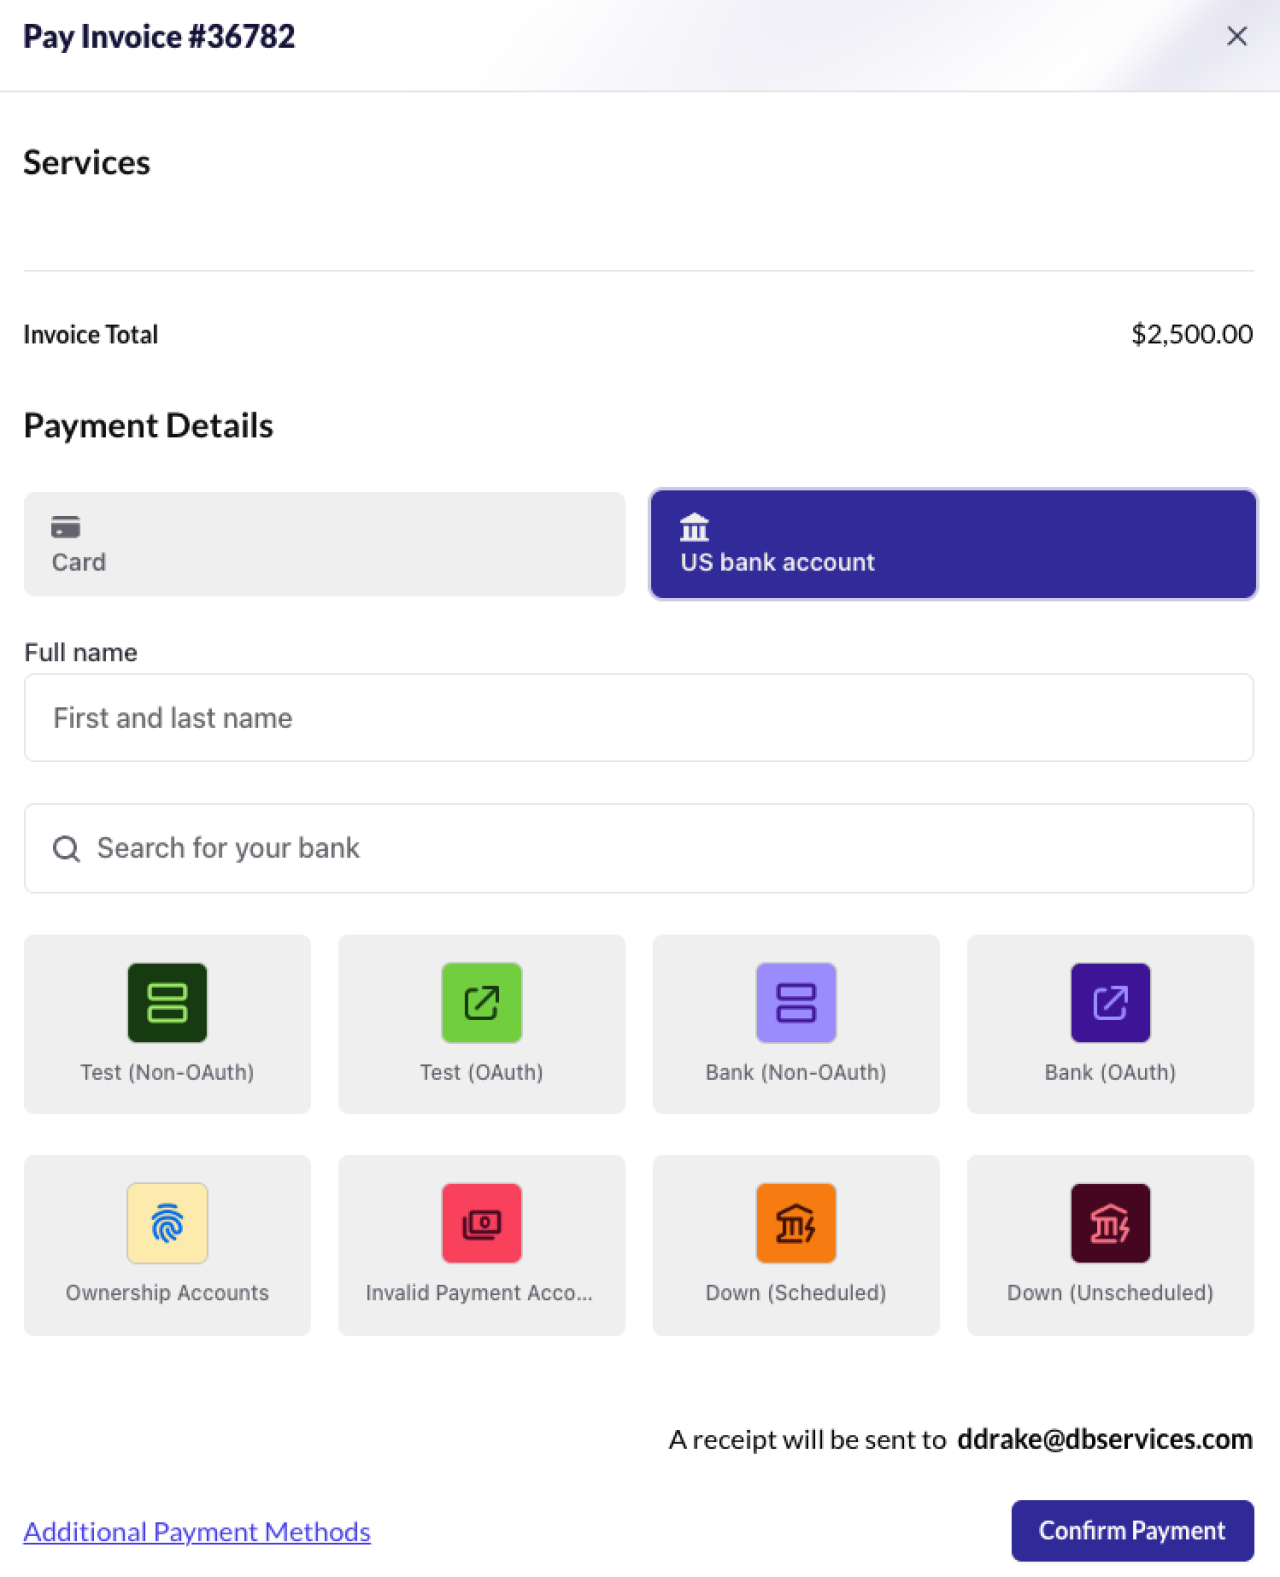
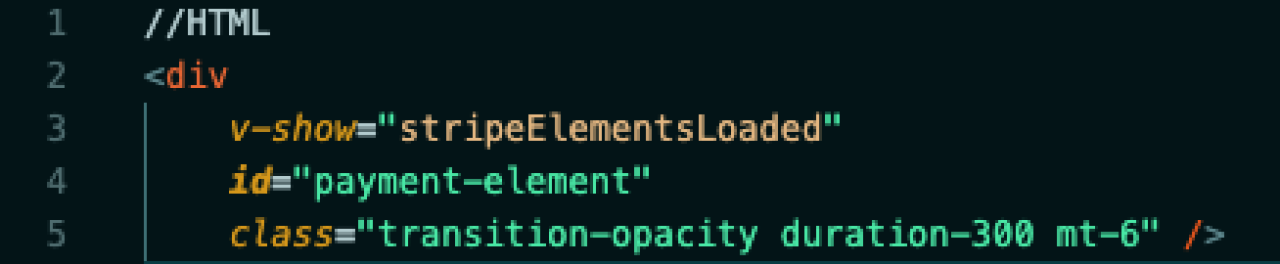
Once the payment intent has been created, we can now mount the element within our portal using the information we created above. In the HTML of your web app, create a div element with an ID that will be used in paymentElement.mount(). In the examples below, we use "payment-element".
Confirming Payment
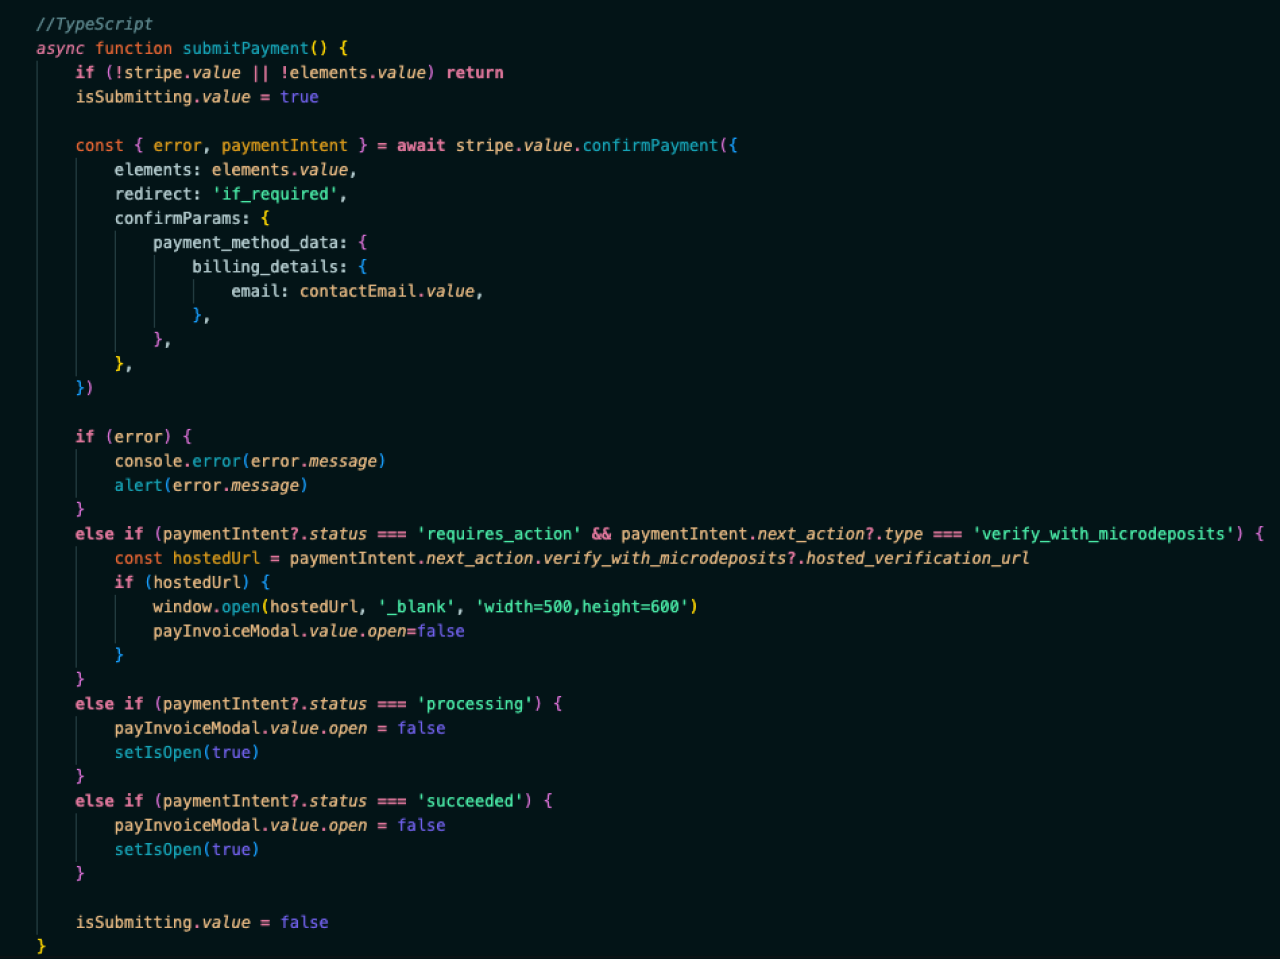
Finally, we will need a function to confirm the payment. Add this within the element that displays the Stripe element. From here, you will set up specific parameters for how you want to error-trap specific statuses, where the user should navigate after payment, and whether you want the user emailed a receipt.
Conclusion
ACH is a practical lever for reducing costs, streamlining payment workflows, and providing customers with a reliable alternative to credit cards. The Stripe integration is approachable, and the efficiency gains compound with volume. If your business processes recurring billing, B2B transactions, or high-ticket payments, this is a move worth prioritizing.
Not sure where to start or want to get it done right the first time? Take a look at our integration capabilities, or reach out to DB Services and let's talk through what makes sense for your setup!
Need a payment integration that works the way your business does? DB Services builds custom web apps that connect your systems and streamline how you collect. Reach out today.